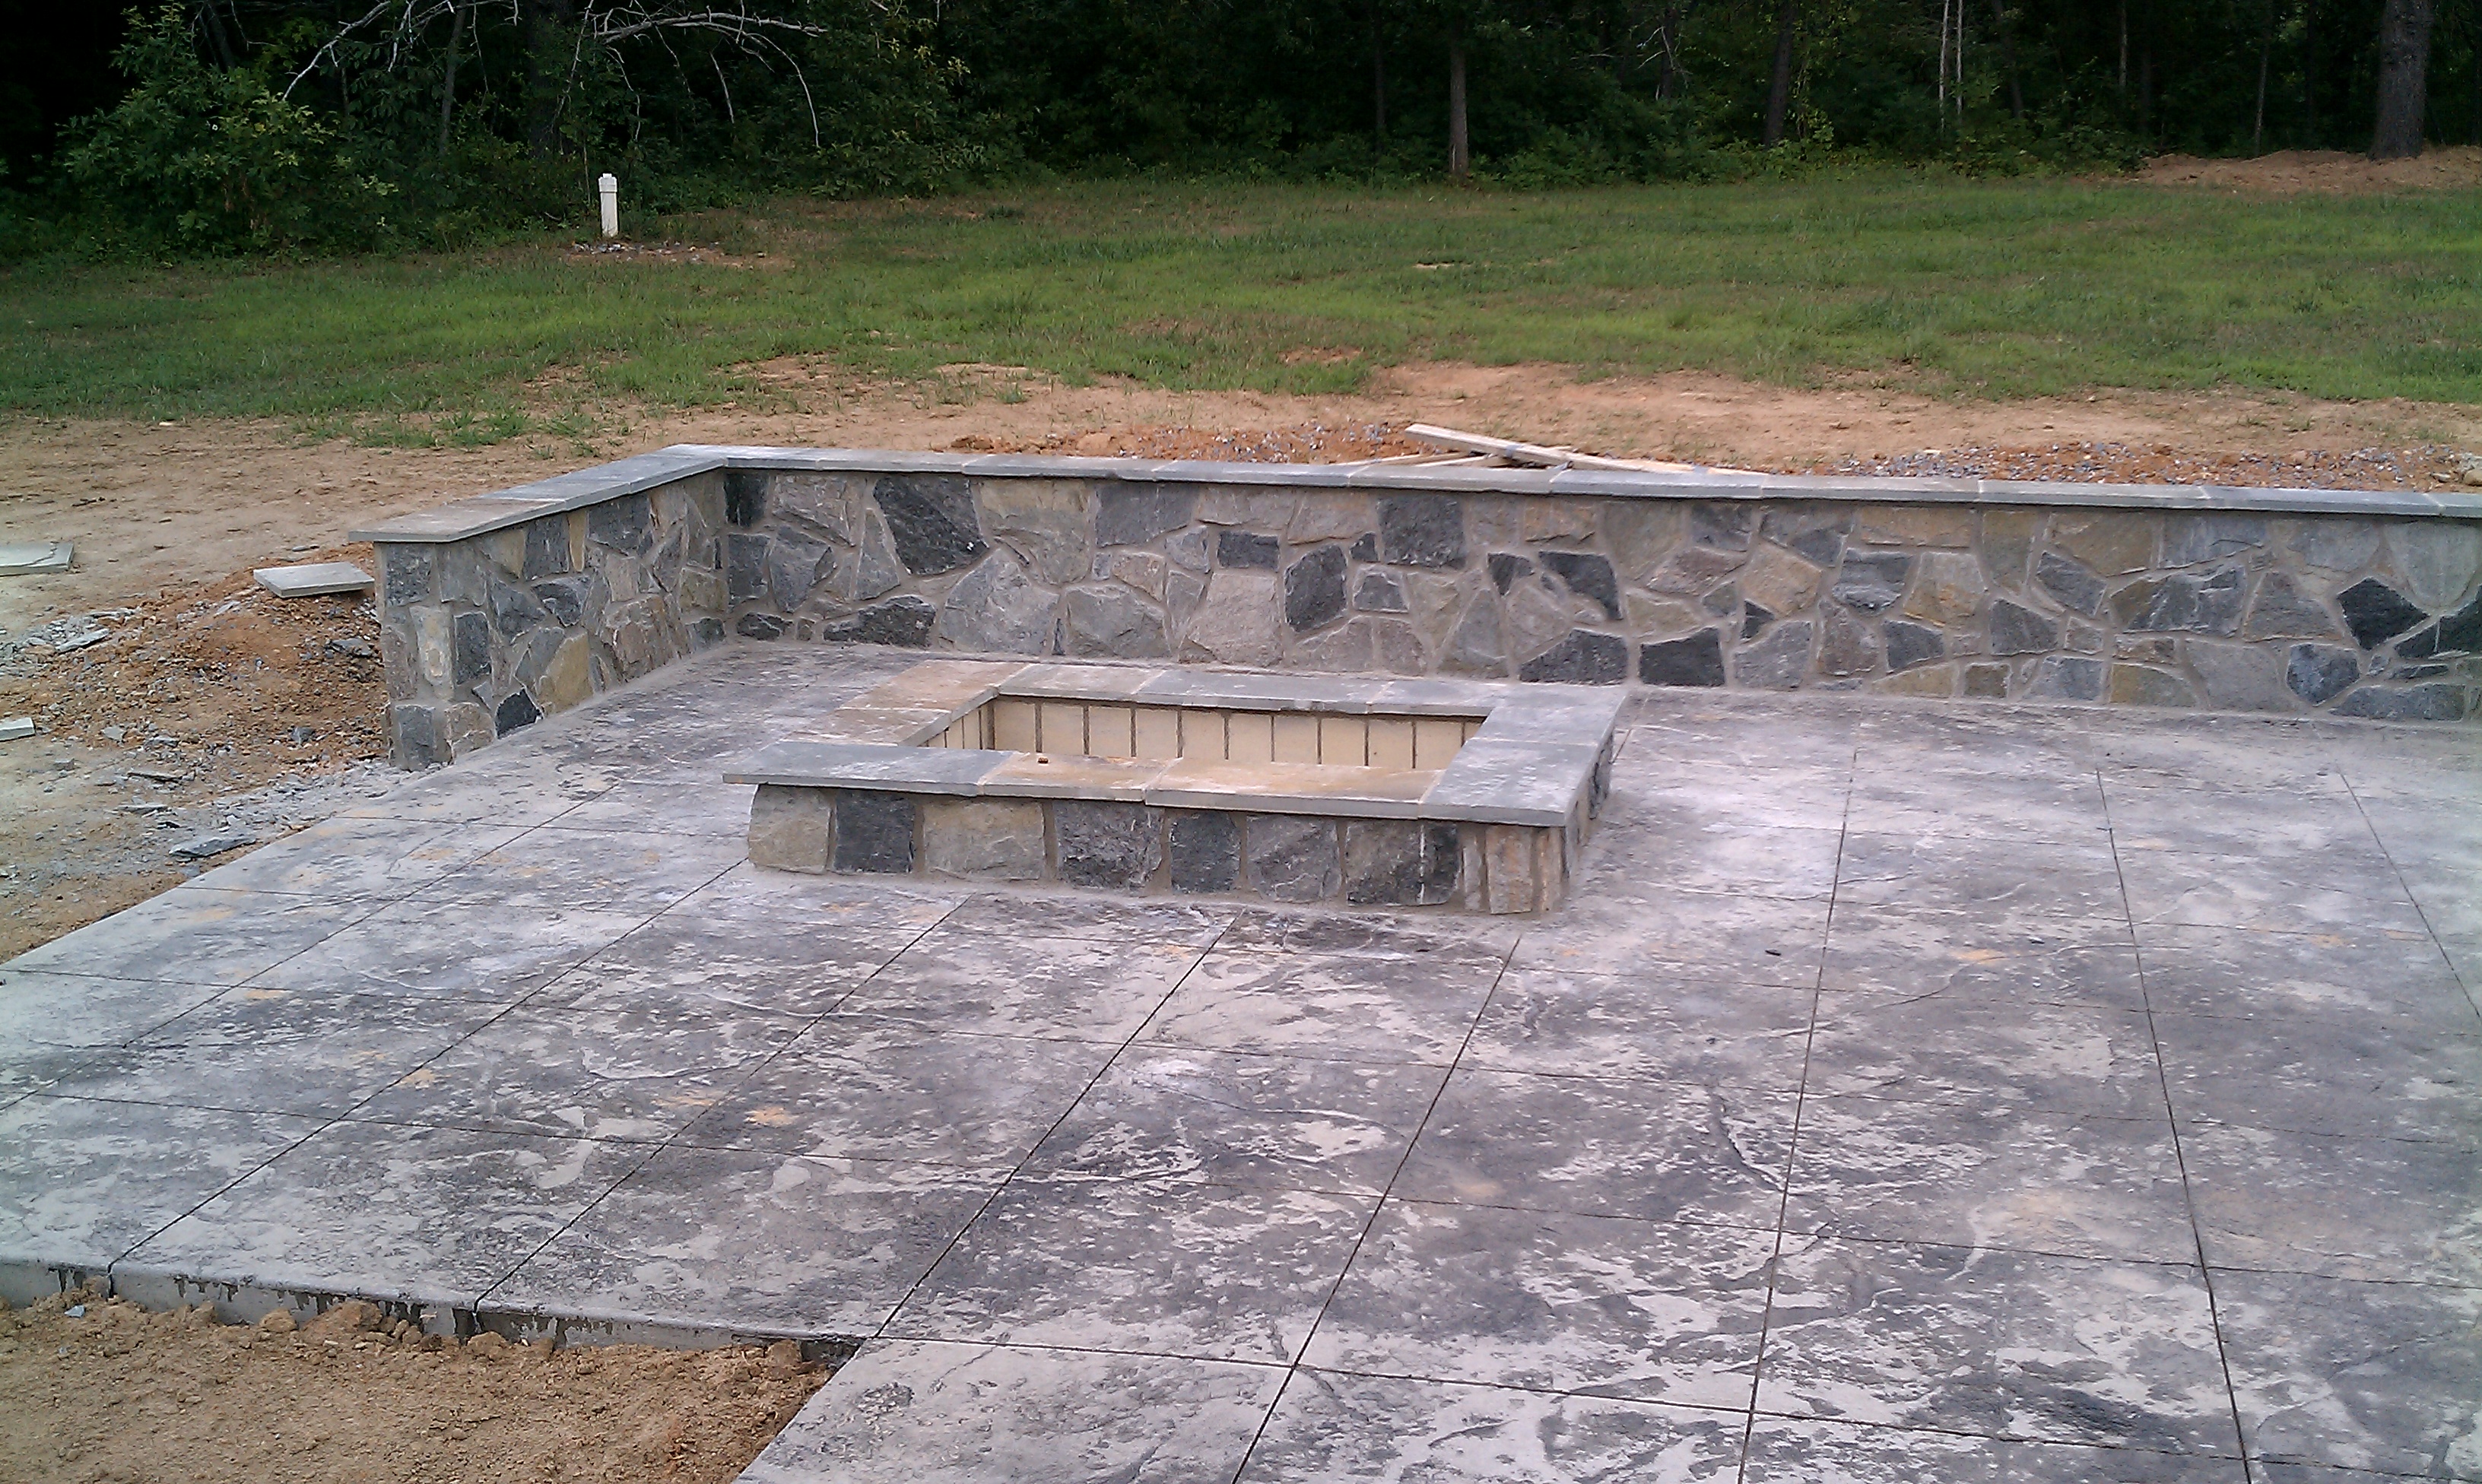
I meet with a fair number of homeowners who say “I either want a firepit or a fireplace.” This uncertainty is actually a great place to start discussing how they’re going to use the space and how much they’d like to invest in the space, Continue reading “Should I Build a Fire Pit or a Fireplace?”
Travertine Paver Patio Installers in Virginia – What to Know
When I was designing landscapes in Arizona, one option we had available to us was travertine marble tile. These were actual tiles – typically 12″x12″ and less than a half inch think – so they had to be laid in a mortar bed on a concrete slab. Shortly after landing in Virginia in 2005, I started seeing travertine pavers make an appearance.
These are really cool because they’re an inch thick and are laid just like a concrete paver. You build up with a base layer of compacted gravel (21A or crusher run), then use a one inch layer of sand as your bedding layer. Once the pavers are in place they’re compacted and polymeric sand is swept into the joints. That’s it. It’s a beautiful finished product that has the ability to flex and move like a traditional concrete paver patio in Virginia. From the test data I’ve seen online, travertine pavers have a compressive strength similar to concrete pavers and can even be used for driveways!
The biggest challenge I’ve found with designing travertine paver patios in Virginia is making the materials make sense. Travertine in California or Arizona doesn’t look out of place. It can look a little foreign here, though. I recently designed a fireplace, seat wall, and travertine paver patio as part of a winery landscape design project. I used a plum-colored flagstone to tie in with the warm tones of the travertine and the rich reddish colors in the fireplace stone, and I’m quite pleased with how it turned out. All those color theory classes have finally paid off.
I’m starting my next travertine paver patio project this week, and I may have one more in the pipeline as part of a swimming pool project. The travertine pavers are a great product that (unlike concrete pavers and flagstone) aren’t in every other backyard. Making it work requires someone who can integrate this new material in the landscape design while blending all the colors harmoniously. In other words, you need a landscape designer. Contact me to set up a consultation if you’re looking to build a travertine paver patio in Virginia, Maryland, or DC and I’ll be happy to talk with you about it!
Accessibility and Universal Design in the Landscape
When I was studying interior design I was fascinated by universal design. While I don’t trust Wikipedia for everything, their definition nails it:
Universal design refers to broad-spectrum ideas meant to produce buildings, products, and environments that are inherently accessible to both people without disabilities and people with disabilities.
I think universal design is brilliant. Well-done universal design functions well for everyone, and in many cases it’s accessible to everyone without looking institutional. Examples of this inside the home would be showers that look like any other high-end bathroom but can accommodate a wheelchair, or grab bars that match the home’s decor. We can carry these same ideas to the outside.
Keeping paths as level or as gently inclined as possible is one way of making them accessible to as many people as possible. The Americans with Disabilities Act has some good guidelines for this sort of thing, as it’s based on lots of research into what people can comfortably navigate. We can also make these surfaces ADA compliant, allowing wheelchairs to easily roll across them. Asphalt is good, gravel is bad. But what if asphalt isn’t the look we want?

There are products out there that can bind gravel to keep it looking natural while still allowing wheelchairs to use the path. Two of these are Gravel-Lok and Klingstone Path. If you’re here in Virginia, you can go to James Madison’s Montpelier (in Orange County) to see what Klingstone Paths look like in person. It’s pretty exciting.
For most other design considerations, universal design outside has many of the same considerations as the inside. Outdoor kitchens can be made usable for anyone, and lighting design becomes even more important for safety and wayfinding at night. If you’re looking to age in place, or you know someone who is, give me a call. I’d be happy to talk with you about design steps we can take to keep the outdoors accessible for years to come.
Virginia Deck Design Explained, Part 1: Footers and Ledger Attachment
My name is Dave Marciniak, landscape designer and owner of Revolutionary Gardens, and I use jargon.
I’m deeply sorry.
However, the fact is that when it comes to building everything has a name. It’s easier to use the technical term than a long-winded explanation. A great example is the French phrase “l’esprit de l’escalier.” It’s literally translated as spirit of the stairs, but the meaning is “thinking of the right comeback in an argument after it’s too late (and you’re walking down the stairs).” So in the interest of making myself easier to understand, I’m going to do a multi-part guide to understanding the key parts of deck construction, starting with the first step of construction: the footers and ledger. If these parts of the deck aren’t right, your deck could fail pretty spectacularly.

Before we get started, a disclaimer is in order. This is not intended to be a how-to guide for designing or building a deck, just an explanation of terms. I recommend working with professionals to design and install your deck, and at a minimum you should ALWAYS pull permits and have your plans and construction reviewed by the municipality in which you live. Got it? Good.
Footers
Unless you’re cantilevering your deck (which is another post), you need posts. Those posts need to be anchored firmly in the ground, and your county probably sets out the minimum requirements in a Typical Deck Details packet. The current standard is to use a 6″x 6″ pressure-treated post. The size of your footers is dictated by the framing they’re supporting, but minimum requirement is 16″x16″ square, up to 24″x24″ square. As for the depth, you need to dig down to the locally accepted frost depth. In most of Northern Virginia, that is 24″ down. If you live farther north, you may be digging down three or four feet. All of your footers need to be anchored in concrete.
Ledger
In most counties you’ll need to have the ledger board in place when you call for a footer inspection. The ledger board is the framing lumber (usually a 2X? piece of lumber) that is attached to the structure of the house when building an attached deck. I prefer building a deck this way, because it means I don’t have posts right up next to the house.
The ledger attachment is critical to the success of your deck project. After all, if you do it wrong your deck can fall off. Therefore, there are detailed specifications on how to install the ledger. If you’re attached to the home’s band board (it’s the board along the perimeter of the home that’s in line with that level’s floor joists) you’ll need to remove the siding, install flashing, and attach directly to the board. Sandwiching the siding between the house and the ledger is bad.If your home has a brick veneer over the wood, the county may require you to remove that brick. I don’t recall ever being allowed to simply drill through the brick if it’s not structural.
If you’re attaching to masonry (poured concrete walls or block walls), you’ll use either expansion anchors or epoxy anchors to hold the ledger board in place. The great thing about working with approved details is that they even tell you exactly how many anchors to use and how to space them out. You don’t need to be a master baker to make brownies, you just have to follow the directions on the box. Just be sure you get good directions. Hiring a landscape designer who designs decks for homeowners in Virginia, Maryland, and DC could be a good place to start. Click my contact page and we’ll talk.
Alternately if you’re just looking for an off-the-shelf solution, to check out my friend Joe’s deck plan packages Click Here!
Next week we’ll talk framing: beams, joists, and how they connect to the ledger and the posts. The ankle bone’s connected to the leg bone, and all that good stuff!
Drainage and Infrastructure Are Not Like Milk Duds
I’m still recovering from Halloween – 538 trick-or-treaters is a LOT Of kids – and it’s still framing how I look at things. Of the nearly $200 we spent on candy we have a bowlful left, and as I was pawing through the bowl for a mid-morning snack I kept encountering Milk Duds. Boxes and boxes of Milk Duds. They’re ok, I suppose, but I’ve never met anyone who got excited about them. It takes some amazing skill to be able to combine chocolate and caramel, two awesome flavors, in a way no one loves.
A lot of people look at the essential foundations of the landscape as if they were Milk Duds, something that you can’t avoid but don’t love. It doesn’t have to be that way! I’ve already gone on and on about dry streambeds as an attractive way to move water through the landscape. It’s also possible to move stormwater in a more formal way, using it as a water feature. When I took care of the grounds at the Salk Institute in La Jolla, California, I got to see a really neat way of handling rainwater. Here’s the wide-angle view of the buildings:
Every floor has a balcony overlooking the central courtyard, but what architect Louis I. Kahn did was he stepped each balcony back as they got higher, so that the rainwater flowed off the flat roof onto the edge of the balcony, through the scuppers, and onto the balcony below that, and on and on for the six floors of the building.

The idea was to create a series of cascading waterfalls, and it was a really cool idea. Now, ideas do come down to execution. If you worked at the Salk and wonder why you never really saw this, sadly, the reality check is that clearly the concrete company who poured the floors didn’t get the memo. In a heavy rain, water pooled on the balconies and flowed the wrong way, right into the labs. Rainy days meant all of us – landscapers, carpenters, plumbers – grabbed long-handled squeegees and saved Science from Nature. Hm. Is there an allegory in there?
Regardless, Louis I. Kahn’s design intent shows that drainage and infrastructure can be handled artfully. Where a lesser architect may have channeled the water into drains and hidden plumbing runs that daylighted in the scrub above the cliffs, he made them a feature. That’s a testament to what design can do. Thus inspired, I’m off to see if maybe microwaving Milk Duds makes them better.
Winterberry Holly | Ilex verticillata
With fall comes an initial blaze of color as the trees turn, followed by a whole lot of brown and gray. Luckily we have a gorgeous plant for fall color: Winterberry holly, or Ilex verticillata if you like botanical names. There are several varieties, but some of the more commonly seen winterberry hollies in the DC metro area are:
- ‘Winter Red’ – a prolific berry producer that grows to 6 to 8 feet
- ‘Red Sprite’ – a dwarf variety that stays to around 2 to 4 feet
- ‘Apollo’ – a male pollinator that hangs out at around 8 feet. You can’t have berries without a boy plant. Yay, nature!
I was just measuring a site for a new client and the folks who did their original landscaping loved winterberry holly. Here’s a great example of what they do in late September:
And, here’s a different client site, taken in December. Oh no, where are the leaves?! Oh, that’s right. Ilex verticillata is a deciduous shrub, meaning that it will drop its leaves in the fall. With berries like this, who needs leaves?
All the berries make winterberry holly an excellent choice for those wanting to provide something for the birds. The above photo of the leafless holly was taken right before Snowpocalypse burst upon us a couple of years ago. The happy birds stripped the bushes bare over the ensuing weeks and were later seen looking for South Beach Diet birdseed. True story.
Want to buy Winterberry Holly in Virginia?
Sweet Box (Sarcococca)
Right plant, right place. I know I harp on that a lot. Sorry about that. The fact of the matter is that a lot of people have these teeny-tiny little areas for which nursery-fresh plants in 3 gallon pots look perfect. And then they grow. And grow. If only there were an evergreen shrub that grows slowly, stays small, and is typically avoided by the deer.
If only!
I like Sweet Box (Sarcococca hookeriana var. humilis) a lot as a plant for tight spaces. Its dark green foliage plays really nicely with brick and stone, it makes flowers and foliage around it pop, and it’s undemanding. If we have a partial shade situation, I’ll even use it in place of liriope if I’m trying to create a border. In the photo below, we used Sarcococca to edge the walk because the homeowner didn’t want to have to mess with liriope.
If you want numbers, it’ll grow to 12-24 inches tall and wide, gets white flowers in the spring time, and is hardy in zones 7-9. Like any other slow-growing specimen they’re pricey, but I personally think the ease of maintenance makes the added cost pay off.
Deer-Resistant Shade Perennials for Northern Virginia
When I design a landscape for a brand new home in a subdivision that was until recently a hay field, I rarely get to use shade plants. Then there are loads of established landscapes all over northern Virginia, with towering trees shading the entire property and hogging all the water. There’s a magic to these properties that you can’t buy (unless you can somehow afford to transplant 80 foot tall oaks). Unfortunately, there’s a pest that often accompanies these majestic wooded properties:
Yep. Deer. Don’t let those pretty lashes fool you. They’ll devour your daylilies, have a meal of your hosta, ruminate on your rhododendron… nasty buggers. What’s a gardener to do?
This is a list of shade perennials that historically have been relatively safe from deer, in my experience. Why so many disclaimers? Because deer don’t read this blog, and in a tough year all bets are off.
Aquilegia (Columbine)
Astilbe
Bergenia
Convallaria (Lily of the Valley)
Dicentra
Ferns (most)
Galium (although a client in Vienna recently told me even this joined the buffet)
Helleborus (Lenten Rose)
Iris
Ligularia
Pachysandra
Tiarella
What is a Concrete Turndown Edge on a Patio, Anyhow?
Sounds so fancypants, doesn’t it? I have a few projects underway that need one, and it’s a simple concept that sounds more involved than it is.
When installing a patio, you want it to have a slight pitch so water doesn’t pool on the surface. If we’re lucky, the grade slopes away from the house at a similar pitch as the patio, so we can prep the base and pour the slab on grade. If there’s a massive difference in grade, we may need a retaining wall at or just beyond the edge of the patio. What about the middle ground between the two?
A turndown edge lets us build up the edge of a patio without the expense of having to build a retaining wall under it. We simply form up the edge, shape the gravel under the slab to create a shape similar to the image, and pour the concrete. Now you know what a concrete turndown edge is, should it come up as part of your northern Virginia landscape design.
Landscape Design Lessons from a Newport Mansion
Several weeks ago MJ and I made the drive to Rhode Island for my niece’s high school graduation. We stayed an extra day so we could celebrate my mom’s birthday. Since everyone had to work during the daytime and we don’t get to RI very often, we made the trip to one of my favorite Newport Mansions, The Elms.
You would think that the grounds of a place like The Elms would be so far removed from reality that there’s nothing you could take back and use in your own space. Au contraire mon frere! Just like a catering recipe, you can totally reduce it down for home use (now I want cupcakes).
Lesson #1: A comfy place to sit in the shade is always a great idea.
Sometimes a bench is just to create a focal point, and sometimes it gives people a place to sit and chat. It should always be fabulous, though.
Lesson #2: Outbuildings deserve love too.
When I’m working with my clients to design screen houses, pool houses, or even sheds, I always try to pull architectural details from the house to tie everything together. This gate is on the carriage house behind the mansion. I doubt that Mr. and Mrs. Berwind or their friends ever had reason to see it, but the architect knew.
Lesson #3: Focal points are important.
This section of the garden is a really cool “hallway” of clipped evergreens that leads to a service drive. However, the fountain serves as a focal point that “stops” the eye. See how different the space would look without it?
Instead of stopping your eye, the rhythm of the landscape design leads you right out of the garden. No me gusta!
Lesson #4: Everyone loves a surprise.
I’m a huge fan of elements of a space revealing themselves to you a little at a time. It adds to the sense of wonder if we can move through a garden and periodically say “hey, what’s that? Cool!” Even in a manicured garden like that at The Elms there’s room for surprises.
Lesson #5: The lawn is a design element.
There are a lot of lawn-haters out there. I’m not one of them. Sometimes you need lawn area for practical reasons (kids, dogs, lawn darts) but other times the lawn can make the design by acting as negative space. This allows individual elements to pop in ways they otherwise wouldn’t.
Look at that awesome weeping beech on the right side of the photo. Forget the architectural elements in this shot, losing the punch of this tree would be a shame. Sitting on the broad flat plane of the lawn as it does, the tree makes a strong statement.
If you’ve never been to The Elms, I strongly encourage you to go. Why is it my favorite “summer cottage”? Mr. Berwind believed that a proper house should run as if by magic, with guests never seeing the utilitarian aspects. It’s pretty amazing.
Do you have a favorite Newport Mansion?