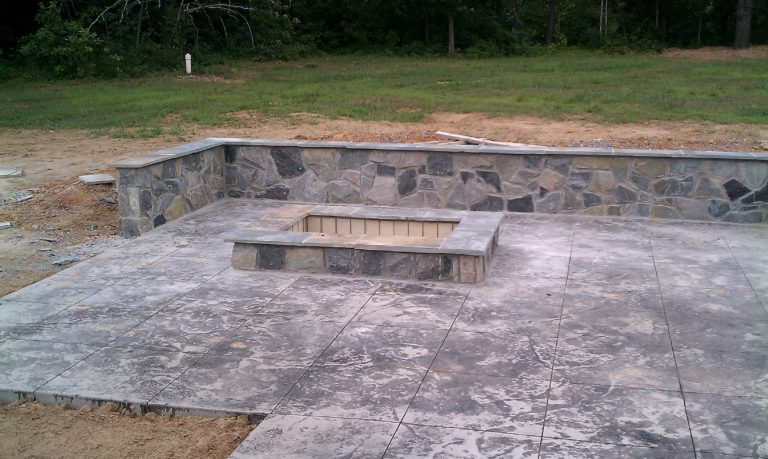
I meet with a fair number of homeowners who say “I either want a firepit or a fireplace.” This uncertainty is actually a great place to start discussing how they’re going to use the space and how much they’d like to invest in the space, Continue reading “Should I Build a Fire Pit or a Fireplace?”
Travertine Paver Patio Installers in Virginia – What to Know
When I was designing landscapes in Arizona, one option we had available to us was travertine marble tile. These were actual tiles – typically 12″x12″ and less than a half inch think – so they had to be laid in a mortar bed on a concrete slab. Shortly after landing in Virginia in 2005, I started seeing travertine pavers make an appearance.
These are really cool because they’re an inch thick and are laid just like a concrete paver. You build up with a base layer of compacted gravel (21A or crusher run), then use a one inch layer of sand as your bedding layer. Once the pavers are in place they’re compacted and polymeric sand is swept into the joints. That’s it. It’s a beautiful finished product that has the ability to flex and move like a traditional concrete paver patio in Virginia. From the test data I’ve seen online, travertine pavers have a compressive strength similar to concrete pavers and can even be used for driveways!
The biggest challenge I’ve found with designing travertine paver patios in Virginia is making the materials make sense. Travertine in California or Arizona doesn’t look out of place. It can look a little foreign here, though. I recently designed a fireplace, seat wall, and travertine paver patio as part of a winery landscape design project. I used a plum-colored flagstone to tie in with the warm tones of the travertine and the rich reddish colors in the fireplace stone, and I’m quite pleased with how it turned out. All those color theory classes have finally paid off.
I’m starting my next travertine paver patio project this week, and I may have one more in the pipeline as part of a swimming pool project. The travertine pavers are a great product that (unlike concrete pavers and flagstone) aren’t in every other backyard. Making it work requires someone who can integrate this new material in the landscape design while blending all the colors harmoniously. In other words, you need a landscape designer. Contact me to set up a consultation if you’re looking to build a travertine paver patio in Virginia, Maryland, or DC and I’ll be happy to talk with you about it!
Understanding Flagstone: Sawcut, Thermaled, and Chiseled Edges
You’ve decided to use flagstone in the landscape. Good call! You may not be done making decisions, however. If the stone will be used in an application where you see the edge of the piece (step treads, wall caps, etc) you’ll have to think about the finished look.
Thickness
The first thing to consider is the thickness of the stone. The typical stone we use for a wet-lay patio can vary in thickness, from a hair under an inch to over two inches. When building steps or a cap, you want to see a consistent thickness of stone all the way across.
Something else to consider is that often a thicker stone will look better. That 1″ thick flagstone can look wimpy. A 2″ piece has a lot more heft to it. In some cases you may want to go even thicker, but just be aware that now you’re looking at significant additional costs.
The Edge – Sawcut Flagstone
The most common edge “treatment” isn’t really even a treatment. The rectangular slabs of flagstone are cut with a giant saw, and you can often see the marks from the blade on the stone. It’s fine, but it’s certainly not an aesthetically exciting finish.
The Edge – Thermaled Flagstone
One of the most common edge treatments (and one that I think looks great) is thermal-treated. This is accomplished by taking a piece of sawcut flagstone, wetting down the edge, and heating it with a torch. Done correctly the water turns to steam and pops off small pieces of the stone, resulting in a smoothly textured and very consistent surface. Done incorrectly, the piece overheats and splits. This is why most stone yards offer to provide thermaled stone.
The Edge – Chiseled Flagstone
Another way of treating the edges of flagstone is to give them a chiseled appearance. It’s another technique that’s simple to describe and more difficult to do: the mason uses a chisel to remove small, evenly sized pieces of material from the edge of the stone until it has a very cool, consistent rock-faced look across the edge. Some companies do this on site, but most get the stone from the stoneyard like this.
When designing with stone there are so many variables to consider. While it seems inconsequential at first, the right edge treatment can make the difference between a good result and a great result. If you’re looking for help achieving that great result, contact me for a design consultation!
Fredericksburg Pool, Patio & Pergola Design
This week I stopped off to check in with a landscape design client in Fredericksburg, Virginia. This is probably one of my favorite projects of the year. I’ll do a more comprehensive post (showing plan and elevation drawings, etc) in a couple of weeks when a few more details are completed, but I was too excited to wait.
The architect responsible for the addition figured out the orientation of a pool and the upper patio, and I ran with it from there. The homeowners were an absolute blast to work with, too.
The pergola is cedar, and was fabricated by The Cedar Store and assembled by the poolbuilder.
It makes for a pretty sweet outdoor space.
The plantings are still “too young for prime time” but it won’t take long till they look great. Give it a couple of years and this will be a swoon-worthy garden! Plantings were completed by Stadler Nurseries.
Landscape Design Lessons from a Newport Mansion
Several weeks ago MJ and I made the drive to Rhode Island for my niece’s high school graduation. We stayed an extra day so we could celebrate my mom’s birthday. Since everyone had to work during the daytime and we don’t get to RI very often, we made the trip to one of my favorite Newport Mansions, The Elms.
You would think that the grounds of a place like The Elms would be so far removed from reality that there’s nothing you could take back and use in your own space. Au contraire mon frere! Just like a catering recipe, you can totally reduce it down for home use (now I want cupcakes).
Lesson #1: A comfy place to sit in the shade is always a great idea.
Sometimes a bench is just to create a focal point, and sometimes it gives people a place to sit and chat. It should always be fabulous, though.
Lesson #2: Outbuildings deserve love too.
When I’m working with my clients to design screen houses, pool houses, or even sheds, I always try to pull architectural details from the house to tie everything together. This gate is on the carriage house behind the mansion. I doubt that Mr. and Mrs. Berwind or their friends ever had reason to see it, but the architect knew.
Lesson #3: Focal points are important.
This section of the garden is a really cool “hallway” of clipped evergreens that leads to a service drive. However, the fountain serves as a focal point that “stops” the eye. See how different the space would look without it?
Instead of stopping your eye, the rhythm of the landscape design leads you right out of the garden. No me gusta!
Lesson #4: Everyone loves a surprise.
I’m a huge fan of elements of a space revealing themselves to you a little at a time. It adds to the sense of wonder if we can move through a garden and periodically say “hey, what’s that? Cool!” Even in a manicured garden like that at The Elms there’s room for surprises.
Lesson #5: The lawn is a design element.
There are a lot of lawn-haters out there. I’m not one of them. Sometimes you need lawn area for practical reasons (kids, dogs, lawn darts) but other times the lawn can make the design by acting as negative space. This allows individual elements to pop in ways they otherwise wouldn’t.
Look at that awesome weeping beech on the right side of the photo. Forget the architectural elements in this shot, losing the punch of this tree would be a shame. Sitting on the broad flat plane of the lawn as it does, the tree makes a strong statement.
If you’ve never been to The Elms, I strongly encourage you to go. Why is it my favorite “summer cottage”? Mr. Berwind believed that a proper house should run as if by magic, with guests never seeing the utilitarian aspects. It’s pretty amazing.
Do you have a favorite Newport Mansion?
Using Dry Stream Beds for Drainage
Here in Virginia we have clay soils that don’t drain particularly well. We also get a fair bit of rainfall. When new subdivisions are built, especially in northern Virginia, the county-mandated drainage plan often moves water through everyone’s backyards towards a county storm drain. If you have a newer home, you may even have a legally designated stormwater easement on your survey plat.
What this means is that for many homeowners, you’re likely to have a fair bit of water moving through your yard during a storm event. When you moved in, the builder had probably sodded your backyard, and well-established grass stands up reasonably well to a decent volume of water moving across it.
Sometimes grass isn’t an option, though. Maybe trees have grown up and grass will no longer grow, and you’re experiencing erosion. Maybe your new patio or plant beds mean that water needs to be diverted. Or, as was the case for these folks, the slope was so steep that keeping the grass cut was a miserable experience.
So, the decision was made to turn the area in front of the downhill fence into a planting bed. Having all your mulch washed into a pile against the fence is never fun, so I looked at where the swale was most pronounced – this is where the water was flowing – and built a dry creek bed to carry the water.
We also used a number of plants to help hold the slope, including winter jasmine, cotoneaster, and pachysandra. As the birch trees grow up and fill out, this will be a nice little oasis in suburbia.
Fighting nature is hard. Working with it – whenever you can – is the better choice.
Why Is This Retaining Wall Failing?
I walk by this wall whenever I walk to the post office in downtown Culpeper. Walls like this are pretty common in older neighborhoods like mine. Leaning and generally unhappy walls are, sadly, pretty common as well. So what gives? Why do these walls look like they’re ready to flop over on the sidewalk?
There are several possible explanations. The first is insufficient footer, or failure to tie the wall in with the footer. When building a masonry retaining wall in Virginia you generally want to dig down 24″ below grade, so you’re below the frost line. You then pour a beefy footer (thickness varies depending on application), often with rebar coming up from the footer to tie the wall to the footer. Our home was built in 1906 and renovated in the 1950s, and I can tell you with certainty that there was not a lot of digging to frost depth being done way back then.
Another possibility is insufficient drainage behind the wall. Water is a wall’s worst enemy. Hydrostatic pressure is a major cause of wall failure. The way we avoid a buildup of pressure is by using a “drainage chimney” of clean gravel behind the wall, along with periodic weep holes.
What makes this wall great for illustrative purposes is the fact that the wall likely started to fail because of hydrostatic pressure (water buildup behind the wall). This pushed the top of the wall forward, creating a gap between the wall and the slab. What’s right above the slab? Downspouts! So not only do we have a gap, we’re pouring gallons upon gallons of water behind the wall with every storm. Awesome.
So how would I fix this wall? I think we’re beyond the point of fixing something like this, and it needs to come out. Improper construction is hard to correct, and when it gets this bad – there’s no Band-Aid big enough.
What Landscape Work Can Be Done in Fall and Winter?
I get this question a lot this time of year. I get my fall rush once the kids are back in school, it takes a few weeks to get through the design process, and suddenly we’re just past Halloween. Is it too late? It depends on what you’re doing.
Plants
Woody trees and shrubs can be planted almost year-round in Virginia. With the exception of last winter, I’ve had plants go in – and do well – all winter long. As long as the ground isn’t too hard for us to get a pick and shovel in, we can plant woody trees and shrubs. Perennials are another matter. They are generally too delicate to plant after about November 1st, because we’re pretty certain to get a hard frost after that point. I did a post a while back that talks about safe frost dates for northern Virginia.
Asphalt
Most asphalt companies in Virginia shut down sometime in December, and open up again in April. If we’re redesigning a driveway, we need to keep this in mind.
Concrete & Mortar
Concrete is going to be the happiest when the nighttime temperatures stay above freezing. That’s not to say that concrete work shuts down for the winter. On cold days, my masons have set up tents with propane heaters and laid stone all day long in t-shirts. At night, thermal blankets can be placed on flatwork to keep the temperatures high enough. Pointing up and cleaning can get slowed down a bit because the concrete stays “green” longer, but that’s not a problem as long as the mason knows what s/he is doing.
Pavers
Pavers (and segmental retaining walls) can be tricky in the winter. The problem happens when you have a significant amount of rain, sleet, or snow on the base or sub-base. If this moisture is allowed to freeze, you can have long-term settling problems. The solution is to keep the area as dry as possible, and use thermal blankets or other means to keep the base material from freezing. Again, the work can be accomplished in the winter, it just requires a knowledgeable contractor.
Ponds and Waterfalls
These can certainly be installed in the winter, but temperatures below freezing can make working with water less fun than on a sunny, 70 degree afternoon.
Decks, Porches, Pergolas
As long as snow’s not a problem, these can be built all year long
And what if you’re just starting to think about the design process? Winter is a great time to start the design process. I’m currently booking December and January projects. If you have a project you’d like to start planning, send me an email and let’s get started!
Amazing Old Stonework
My mother-in-law was in town this past week. The way I was raised, when you have company from out of town staying with you the right thing to do is run them all over the state (or even other states) until they either go home or fall over. Last weekend we decided to head up to Harper’s Ferry, West Virginia.
If you like natural beauty, it’s a great town and National Park to visit. If you like old buildings and funky shops it rocks too. What really had me giddy like a schoolgirl was all the old stonework. When you build your town where the mountains and the river come together, you build with what you have… and what you have is stone.
Even the steps to the church at the top of the hill are carved from the very rock it sits on, which is really cool. It’s also something I plan to point out to my masons the next time they grumble that my designs are too complex.
There are some huge stone retaining walls holding up vast chunks of this town. Any time I go to an old town I’m humbled by the reminder that even with all of our fancy technological tools and calculations, there’s no substitute for expert craftsmanship.
Stamped Concrete Steps
In the post I just did about stamped concrete, I failed to mention one of my other issues with stamped concrete: the vertical surfaces (steps, turndown edges, etc) often look badly done- like a child’s attempt at making Fred Flintstone’s house out of Play-Doh. This is one more area in which I’ve been impressed recently. Here’s a shot of a set of steps that a stamped concrete contractor in northern Virginia just did for one of my clients:
I grew up in New England, where it’s not unusual for someone to use big slabs of stone for their front steps. This is actually pretty impressive, and I figured it was worth sharing.