I built this! My Brickwood Ovens Mattone Barile Grande review

outdoor water feature dining table

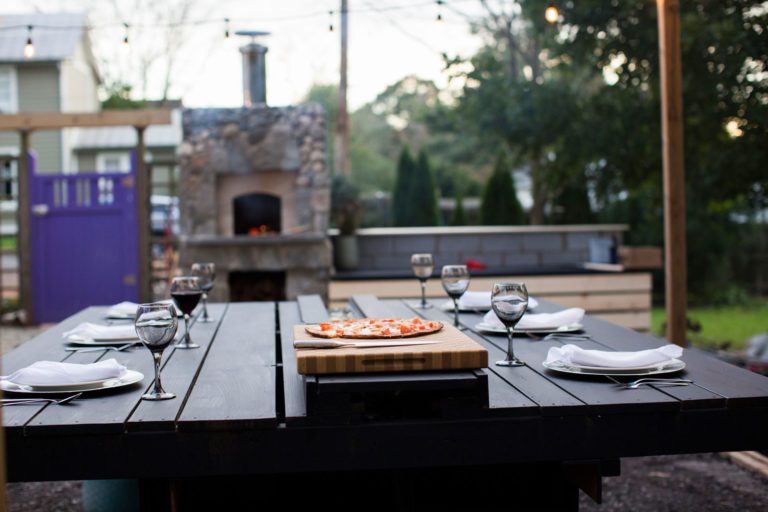
For years, I’d been talking about building a pizza oven in my backyard. At one point I found plans online for how to build a dome-shaped oven the old-fashioned way, a brick at a time, and that was my plan. Many years later that still had not happened, because honestly? It was a little intimidating.

In the meantime, my brother had built a pizza oven using a kit from Brickwood Ovens. He sold that house, and built another Brickwood Oven at his new home.

I told you that I’d been dragging my feet for a long time!

So finally he said “Dave, why don’t you just order what you need from them, and get the damn thing built?” I looked at the available kits, and then did a bunch of research on which oven shape I’d actually want . Part of why I had wanted to build a dome was for the challenge, but that wasn’t necessarily the right shape for my needs. The eventual goal was to roast all the things, which made a rectangular vaulted oven a better choice.

Which Brickwood Oven was right for me?

I knew that I still wanted a brick oven, so one that was cast from refractory cement – even if I did it myself – wasn’t an option. That left me with a choice between the Mattone Barile, and the Mattone Barile Grande. Spinal Tap’s amplifiers are better because they go to 11, so naturally I went with the Mattone Barile Grande. I downloaded the PDF instructions and started designing.

The Mattone Barile Grande sits on a steel-reinforced concrete slab. The first thing I needed to do was work out how much bigger to make the slab. As designed, the oven’s legs are narrower than the oven. I wanted the sides of my oven to be straight up, in a single plane.

Built per the instructions, the Mattone Barile Grande’s shape is visible in the end product, clad in stucco or a stone or brick veneer. Again, I knew I wanted something with a little more visual heft, closing in all but the oven’s opening.

Shopping for my Brickwood Oven

One of the things I like about Brickwood Ovens is that they’ll sell you whatever you want, but they encourage you to source a lot of things locally to save money. From them, I ordered the foam form, the chimney, and the ceramic insulating blanket. All the masonry supplies were sourced locally.

The Brickwood Ovens website states that the average cost to build the base is $450, and the average cost to build the finished oven is $950. I certainly obliterated those targets, but I imagine that if you stuck close to a stock build you could come within 10-20% of those numbers. Even at that, you’re not getting a drop-in kit for anything close, so…. As long as exceeding $1400 by a bit doesn’t mean you’re eating ramen for six months, it’s still worth it.

Most of the items I needed for the base were easy to get. I run a landscape company in a farm town, after all. I got the 4 cubic foot bag of vermiculite at my local feed store. For the record, it did NOT take 4 cubic feet! I ended up using it as extra insulation on top of my oven, though, so that worked out.

Shopping for the actual oven components was a little trickier. They recommend mixing your own refractory mortar to save money, and they give you a shopping list. I had a huge problem with finding 50 lb bags of fire clay. I can only assume it’s a government thing, but no masonry suppliers within 100 miles carry it. They all said that they used to, but no longer can. I ended up ordering it through a pottery supply company 90 minutes away, and drove there so as not to pay to ship 100 lbs of dust.

Portland cement and hydrated lime were easy to get. Apparently silica sand isn’t sold at masonry supply yards here in VA (it was on the west coast), but the local pool supply had it.

I hate the look of yellow fire brick, so I was happy that my local supplier only carries red.

The build

The instructions call for building the oven’s base as a slab at grade. I somehow missed that, and dug a footer at frost depth (24 inches), and blocked up from there. Whoops.

Also, because I wanted a different shape to my oven, my first two courses were a double a row of 8x8x16 cmu, stepping in to 12” block. This was to create a base for my veneer to rest on. After that first course of 12” block, I switched to the 8” block laid per the instructions, surrounded by 4” block to get the width I wanted. I also deviated from the instructions by building a wall parallel with the back wall, 24” from the opening of the wood box. I know myself well enough to know that any wood farther back from there would live there forever. I sure wasn’t going to get it. It also gave me a handy repository for masonry scraps from other projects!

After the base went up I dragged my feet on forming and pouring the floor of the oven. To make it easier to set in place, the oven floor is formed and poured in three separate pieces. Because I didn’t have a hard, level surface like a driveway or concrete patio, I was worried about the forms not being level. That was definitely an issue, and caused some funkiness in the oven floor. It didn’t affect the oven’s functionality, but it led to a lot of cursing as I set and leveled the three slabs.

Using a mini skidsteer with pallet forks, I set the oven floor by myself. Even with a helper or six, I can’t imagine doing this without mechanized equipment. It only took me about an hour to pop the forms off and set the oven floor, which was way better than I expected.

Making the insulating layer of Portland cement and vermiculite was dead simple. Mortaring in the brick frame around the oven floor wasn’t hard, but it did make very clear that I had issues with the forms.

Because I didn’t want to get a load of sand dropped off, I bought Quikrete All-Purpose Sand from Lowes. All I can say about that is SCREW YOU LOWES. For every bag I bought that was actual, coarse, all purpose sand, I ended up with three that were the finest grains of silica sand I’ve ever seen. So while the instructions say to use 60 lb bags of all purpose sand, don’t. If you HAVE to get it from one of the big box hardware stores, get their paver sand from the garden center instead.

Laying in the herringbone brick floor was actually fun. Right up until I turned my head to look at the dog as I was swinging the mallet, nailed my thumb, and ended up at the ER. Don’t look at the dog, y’all.

Once I got the styrofoam form in place and started laying fire brick, it went surprisingly fast. It turns out I used way too much mortar, because some squished out and is visible inside my oven, but that’s ok. A word of advice: the instructions say to soak the firebrick before cutting it. Soak the fire brick. Soak it for HOURS. I rented a gas powered brick saw and it bogged down a little with dry fire brick, but ripped through the soaked brick like butter. Also, do wear a dust mask when cutting fire brick, or you’ll spend the evening coughing like a 6 pack a day smoker running a half marathon.

Once the brickwork was done and had dried, I applied the ceramic insulation and fixed it together with the chicken wire. The first coat of stucco was a little frustrating, and I used way more than planned. The following day, the masonry supply yard was closed so I had to buy finish stucco mix from Lowes. Holy crap, you guys. It was like frosting a cake, it was so easy! It buffed up to a nice, smooth finish, too.

You know what the worst part of this build was? Getting the styrofoam form out. Now like I said, I had a good bit of excess mortar squish through so I’m sure that helped lock the form in place. Even at that, though, you are more likely to lift Mjolnar when Thor isn’t looking than you are to get the form out in fewer than 1000 pieces. Removing the form was when I had my first worries that I had selected too large of an oven. At 6’4, 300 pounds, I am not a small guy, and I was able to crawl into the oven almost to my waist to get the last of the styrofoam.

With a photo shoot looming, I cheated on the next part and paid my guys to build the blockwork surrounding the oven itself, parge everything, install the granite front, and lay the flat stone veneer. So that part went pretty well! I laid in the river rock inlay, and we had the photo shoot.

culpeper landscape design pizza oven

Cooking with the Mattone Barile Grande from Brickwood Ovens

It’s essential to cure the oven slowly, over a period of about a week, to drive the moisture out of the oven. If you don’t, the oven will crack. This was a frustrating process because I’m not a patient person, but I did it. I should note that my oven hasn’t cracked, so… worth it!

outdoor water feature dining table

Knowing that there would be a learning curve to cooking with the Mattone Barile Grande, we opted to make a pretty basic pizza dough, and picked up passata and grocery store mozzerella. There was no sense getting fancy ingredients just to potentially destroy them.

MJ bought me an infra red thermometer gun for my birthday. I highly recommend getting one, as it was a great way to learn what parts of the oven heated up first, what held heat, and how quickly portions cooled as I moved the fire around.

I got impatient and threw the first pizza in at about the one hour mark. Way too soon.

The sweet spot seemed to hit at around 2.5 hours. I was getting consistent readings of 900 degrees and higher, and the pizza cooked up beautifully. My guess is things would’ve been amazing at the 3 hour mark, but at that point the outside temp had dropped into the 30s and this wasn’t as much fun any more. Six years in Phoenix made me soft, what do you want?

Final thoughts

Was it worth building a Brickwood Ovens pizza oven? I’d say, resoundingly, heck yeah! There were some pluses and minuses though.

I felt like the styrofoam form from Brickwood Ovens was fairly priced, and made the build pretty easy. Honestly, I wouldn’t have saved much money had I built a form myself out of plywood, and this was way simpler. The company was easy to deal with, and while I don’t love that they only offer email support, as the owner of a small company myself I totally get it. There are only so many hours in a day.

The plans for the oven were easy to follow. There were a couple of things that were ambiguous, but I either emailed Brickwood, figured it out on my own, or winged it and it all worked out ok.

As mentioned above, I think the cost estimates were optimistic. And you definitely rip through some firewood in the course of heating the oven for pizzas. Obviously a smaller oven will require less wood, so there’s a tradeoff. And I still need to get a door made.

Brickwood Ovens kits are great for DIYers, no question. If you’re even moderately handy you can build a pizza oven for a lot less than the cost of one of those drop-in kits. I think if you want to have one built for you, you’ll need to be smart to keep it cost effective. From a design-build company perspective, our challenge is the number of steps where you do something, then walk away for 3-5 days. For an independent mason working alone or with a helper, I think this would be a great project that they could execute at a very fair price for the homeowner, working in other small jobs during the waiting phases. Because it costs us a good bit of money every time we pull on and off a jobsite, we could really only build a Brickwood Oven cost effectively if it was part of a larger project, and we could bounce to other parts of the yard during the “let it wait” stages.

If you’re hardcore and you want to build a Brickwood Oven yourself? Go to their site and start shopping! Keep in mind that if you want to do the fun stuff (the oven), we can do the boring stuff like the footer, the blockwork for the base, etc. And if you want us to do the whole thing, contact us today! Great pizza starts at home.


What Makes Danver Stainless Steel Cabinetry So Great?

In the past year I decided to become a dealer for Danver stainless steel cabinets. I get approached many times a year by companies who want me to hawk their products, so what made me decide to take this opportunity?

outdoor kitchen cabinetry
Source: www.danver.com

First and foremost, these cabinets appeal to me as a designer. I built my first outdoor kitchen in 1997 or 1998. It was your “standard” outdoor kitchen of the time, which means we poured a footer and then built a huge vault out of concrete block, set the grill in the countertop, and stuck two stainless steel doors in the front so the client could swap out the propane cylinder. There was no room for storing plates or utensils, and honestly the space behind those access doors was a hot, dirty cavern just made for black widow spiders. I always felt like something was lacking. I’ve done a few kitchens where we’ve built cabinets out of cedar or ipe and they’re fine, but it’s still wood. It’s also crazy expensive to custom build every cabinet and every door.

Danver stainless steel cabinets are just like buying regular indoor kitchen cabinets. You get to select the width (in 3″ increments), the type of cabinet (sink cabinet, drawers, trash pullout), and you can even select extra deep or extra tall cabinets. The standard finish is a flat panel stainless steel cabinet door, but that can be upgraded:

  • a five-panel door with a recessed panel
  • powdercoating in any one of several standard colors
  • a paint treatment that very convincingly replicates one of several wood grains
  • clearcoating (for locations in tough environments like salt air)
  • a special line of colors and door finishes licensed by upscale furniture makers Brown and Jordan

You can also buy wall cabinets, so you get the same amount of storage opportunity you’d have inside. The drawers have the same soft-close feature as your indoor cabinets. The appliance cabinets are custom built to the exact specifications of whatever appliance you’re using, so it’s a perfect fit. Seriously, I’m love. These are awesome, awesome products.

How about an outdoor media cabinet? Source: www.danver.com
How about an outdoor media cabinet?
Source: www.danver.com

They also appeal to me as a small business owner. These cabinets are made in a small factory just outside Hartford, Connecticut. I went up for a factory tour last October and it was a blast. Mitch, the owner, is clearly passionate and enthusiastic about what he does. He also cares about his staff, which is important to me (I don’t like to work with jerks). They’re always striving to be better, and they provide a rock solid support system for dealers. Can you tell I’m a fan?

YOUR OUTDOOR KITCHEN

So that’s great, you say, but how does that help me get a better outdoor kitchen? The bottom line is that outdoor kitchens are a challenge to design. We walk a fine line – we want to keep the kitchen from being so large it eats your backyard and costs a small fortune, but we want to pack as much function in there as possible. You get more bang for your buck with Danver kitchens.

When we design a masonry kitchen, we usually have to separate appliances and cabinets or drawers with 6″ block, to carry the countertops or any masonry above the opening. So if you want to include a 24″ fridge, a 36″ cabinet, a set of 18″ drawers, and an 18″ icemaker (8 linear feet of stuff), you also have five 6″ blocks surrounding these. That’s 2-1/2 feet of… nothing. Plus it’s around 6 square feet of countertop you may not otherwise need! Any time I lay out appliances for a contractor using a masonry kitchen base I’m appalled at the wasted space.

I'm proud of this one, but look at all that unusable space!!!
I’m proud of this one, but look at all that unusable space!!!

When we design your Danver cabinetry layout, I ask you questions like:

  • what appliances are you looking for?
  • do you want to have a place for trash and recycling?
  • will you have a sink?
  • Are you keeping plates and utensils outside? What about napkins, condiments, or other grilling staples?
  • what will you have that needs plugged in?

These are the same questions as with any kitchen, but we can fit so much more in a smaller space! If you decide you want a really large kitchen, you can fit loads of appliances and storage. It’s pretty amazing.

Are you intrigued? Ready to learn more? Contact us for a kitchen consultation and let’s get started!

Can a Built-In Charcoal Grill Be Installed in an Outdoor Kitchen?

I’m a charcoal snob. It’s one of the reasons why I really only deal with the higher end gas grills, because an infra-red sear burner is the only way to get the same sort of awesome heat that comes pre-loaded with a bag of charcoal. It begs the question, why don’t we see more outdoor kitchens with built-in charcoal grills?

FMduo

When designing an outdoor kitchen, the challenge with the superiority of charcoal over other forms of heat is that there aren’t a lot of budget built-in charcoal grills out there. Whereas the entry point for what I would consider an ok-quality gas built-in grill is $1800-2200, stainless steel charcoal built-ins are a bit more.  I carry a Fire Magic Aurora A830i Gas and Charcoal Combo Grill. It’s pretty great, and the charcoal is lit by the gas burner for ease of lighting, but at a list price of $4,690 it can be a chunk of the budget.

Saffire

If you’re less concerned about the stainless steel look you have more options. Any of the “ceramic egg” smoker/cookers can also be used as a charcoal grill in the open position. It may seem a little big for that purpose but it certainly gets the job done. I want one of these in the worst possible way, because not only have I discovered smoked meats and cheeses – I’ve discovered smoked cocktails and infusions. mmmm. One that I offer is by Saffire, and the price point is pretty great. A freestanding Saffire smoker starts at about $1100, and one designed to sit in a kitchen island is a bit less.

(One of my former neighbors had a Big Green Egg and someone swiped it from his backyard. Nothing is sadder than seeing someone standing in his driveway, screaming “who would take a man’s egg? WHO?!?!? I WILL FIND YOUUUUUUUUUUU!!!”)

You can also click here to read my post on how to build an outdoor kitchen around a freestanding grill – we did it with a gas grill, but charcoal could also work.

It’s a pretty well known fact that I fall victim to the rabbit hole of the internet pretty easily. There’s a bright side to this, though. It means I discovered the Concrete Exchange, an online shop for products by Fu-Tung Cheng. He’s a pretty amazing designer with a contemporary bent to his styling, and he designed a lightweight concrete surround for your basic, everyday $100 Weber kettle grill. Aesthetically, maybe it’s not your cup of tea, but if you like modern  and concrete it’s pretty neat. And functional, too.

So can a built-in charcoal grill be installed in an outdoor kitchen? Sure, but they can be a little tougher to find and may demand a little modification of your cabinetry. In my opinion, though, it’s totally worth it.

If you’re planning your outdoor kitchen or any other landscape project, I’d love to help you. Contact me to discuss next steps!


It’s Charcoal-Grilled Pizza Season!

When I was in high school I had grilled pizza for the first time. I was spending the night at my friend Steve’s house and when he made us grilled pizzas, I thought he was some mystic shamanic grill whisperer. My family made homemade pizzas, of course, but ours were made in the oven, like normal suburbanites..

We're redoing the patio this year, go easy on me
We’re redoing the patio this year, go easy on me

Fast forward a distressingly large number of years and I’m a homeowner with a backyard and an affinity for the grill. At this point I’ll grill just about anything (last night’s grilled bacon was… interesting) and I’ve been grilling pizzas for years. I know it can seem a little daunting so here are the tips that make it a lot less scary.

Grilled pizzas need the right dough

That spongy, high-rising dough that you like for your indoor pizzas? It’s probably going to droop between the grill grates and create a mess. The dough recipe I use is from Cook’s Illustrated (seriously, the subscription is totally worth it, and no this isn’t an affiliate link) and it’s a lot more like a flatbread. After all, it needs to cook really quickly before it chars, and you need to be able to flip it around with tongs. If you’re using wet or heavy toppings you’ll want a dough with olive oil in the crust, as that helps it stand up to moisture.

grilled pizza 01

Go easy on the toppings

Over the coals of a ripping hot charcoal fire is not the place for a Chicago deep dish pie. These pizzas cook fast, so you want something that heats through quickly and a light dusting of cheese that melts readily.

Build your assembly line

Chefs call this mis en place – all your ingredients prepped and ready and laid out for you because when you drop that first circle of doughy awesomeness, there’s no pause button. Grilled pizzas happen in a fluid motion: brush one side of the dough with olive oil, drop it on the grate (oiled side down), pop the bubbles with your tongs for the 90-120 seconds the first side takes, and pull the dough off the grill. Brush the uncooked side with oil, flip the pizza over on your work surface, add your toppings, and pop it back on the grill.

Everything's ready to go, including the wine and acrylic wine glasses. ESPECIALLY the wine.
Everything’s ready to go, including the wine and acrylic wine glasses. ESPECIALLY the wine.

Whenever I make grilled pizza dough I make extra and freeze it in Foodsaver bags. This allows me to thaw a few and use grilled pizzas as a weeknight dinner, even with as busy as MJ and I both are. Our most recent grilled pizzas have included a simple one with tomatoes, basil, and parmesan cheese, and an amazing pizza with shrimp and Feta cheese. What’s your favorite grilled pizza?

Three reasons to have a landscape designer help with your outdoor kitchen

This has been the spring for outdoor kitchens, which is pretty cool considering that I really decided to focus on them this year. Don’t you love it when a plan comes together? While working through the details with a few clients I really came to realize the value I’m bringing to the project – getting these right isn’t easy. Here are three ways in which I’m helping them:

1. We understand the functional needs of an outdoor cook.

If you read my about page you’ll recall that I spent two years studying interior design before getting back into landscape design. There are certain standards that you learn to apply to kitchen design that translate directly to the outdoor kitchen. Counter height standards, the depth people can reach across, minimum workspace dimensions – these are all things that can impact not only your enjoyment of the space but your safety as well.

virginia outdoor kitchen plan

2. We know the appliances and other products.

If you start Googling outdoor appliances and cabinets you’ll discover that there’s a dizzying array of options. You may find yourself asking “why this drawer unit and not that one? What does 18/10 stainless steel mean? Why is a dorm fridge $100 and a similarly sized outdoor fridge $2400?” I’ve been to workshops and showrooms to learn why the difference in stainless steel grade matters, what features to look for in a grill, and why some appliances perform better than others. As a designer I can either select everything for you, or I can help you narrow your choices.

3. We can make it all fit (or tell you when it can’t).

I’ve been designing outdoor kitchens for almost a decade and I’m still amazed at how much space they take up, especially if you want to set it up so you’re on one side and your guests are on the other. Part of the reason why I’m so excited to offer Danver stainless steel cabinetry to my clients is they bolt to one another and allow you to get maximum storage space from each unit.

Virginia outdoor Kitchen Elevation

The more traditional way of doing an outdoor kitchen is building the entire unit from masonry block. It looks cool, but every appliance, cabinet, or drawer unit needs a 4″ support on either side of it. Suddenly that 24″ wide cabinet actually needs 32″ of space. Most masons insist that all your appliances and inserts should be on site when they start so they can get the openings sized correctly. This means that you need to buy and ship thousands of dollars worth of product. Don’t you want to know it fits before you buy it? I thought so. A project that’s installing next week, I’ve spent six hours discussing what fits and what doesn’t and redrawing the plans for the client. Your average contractor isn’t going to do that.

I say it over and over again: my job as a designer is to remove uncertainty from the process. When we design an outdoor kitchen together you’ll be able to see what fits, where it’s going, and how your work areas will function. But most importantly, we’ll have fun.

I’ll also provide a six-pack of beer to christen your kitchen. My extended family (very extended) owns a brewery in Pennsylvania. I’m happy to share the love!

Building a kitchen? Contact me to set up a consultation to find out what Revolutionary Gardens can do for you (and what brewery I’m referring to).


Design Considerations For Outdoor Kitchens

I have a photo of an outdoor kitchen I designed that’s in my presentation portfolio. Outdoor kitchens are funny. They appear to be one of those things for which there is no middle ground. People either want them badly, or they tell their partner no way, no how, not happening, I’m taking the kids and the dog if you do. I think part of the issue is that the photos that get all the attention are of the elaborate, fancy kitchens with grills the size of a ’57 Chevy’s trunk and more stainless steel than you can shake a stick at. Just like your indoor kitchen, there is no one ideal outdoor kitchen – just the one that’s right for you. Let’s look at some design considerations.

Fire

The hub of the outdoor kitchen is the grill. We’ve established that I love the grill, but this isn’t my bias talking. An outdoor kitchen without a grill is an outdoor serving bar. The first question to ask: do you want a built-in grill or a freestanding one? There are advantages to both. A freestanding grill (like my awesome Weber kettle grill) is far less expensive and it can be swapped out easily down the road if it starts deteriorating or fashion trends change. It’s hard to imagine, but stainless steel may go out of style someday. A built-in grill, on the other hand, is generally bigger and beefier than a freestanding grill. Integrated with the structure of the kitchen it just feels good.

As far as cost goes, you can get a freestanding gas grill that does its job well for $500-600. A built-in generally starts at around $1,500 and a brand name (like Viking or Wolf) can be more than double that.

You then have other options to look at, like side burners, warming drawers, etc. Only you know how you cook, but for me a side burner (ideally two) is a must.

Friends & Function

How many people are you cooking for? Not only does that impact the size of the grill, but it establishes how much serving space you need. While you may do most of your prep work inside, you still need to stage the food before it gets cooked and lay it out for serving afterwards.

At the same time, you don’t want to feel silly using the space when it’s just you and the kids grilling up burgers and dogs on a Wednesday. This is where proper space planning can really come into play. And speaking of space planning, let’s talk about bar counters.

A standard outdoor kitchen utilizes a countertop set at the standard height of 36 inches. You can then have it stepped up with a 6 inch backsplash, on top of which is a bar counter. These are great because your guests can sit on bar stools and chat while you’re working, and when it’s time to eat you have a serving counter that’s totally separate from the prep/cooking counter. It’s also a great setup for when you bring in a caterer.

Bar counters are, however, difficult to work in if space is tight. Here’s why: I usually recommend 60 inches (5 feet) of space on the working side of a kitchen. That gives you loads of room to move around, step back from a grill flare-up, bend down to get stuff out of cabinets, and two people can pass by each other. Now add in the width of the counter, typically 2 feet wide, plus another foot for the bar counter. At a minimum we should allow three feet on the far side for people to shuffle their stools back and forth, or to walk through when using the counter as a serving line. So far that’s 5 ft + 2 ft + 1 ft + 3 ft = 11 feet, all before you can define where the dining table and other furniture go.

Bottom line: let function dictate the design, then add in the “ooh shiny” stuff.

Features

If you can put it into your indoor kitchen, you can probably find it for your outdoor kitchen. For example, take a look at all the options Viking offers. You can have sinks, ovens, cabinets, drawers, vent hoods, refrigerators, freezers, and even keggerators. Another vendor for great products for outdoor kitchens is Kalamazoo Outdoor Gourmet. The options are amazing – you can have as much function outside as you do inside.

Lighting is very important as well. Some may find a little bit of romance in the idea of clenching the butt end of a Mini Mag Lite between their teeth as they cook, but I had braces for five years. I want to protect my choppers. Perhaps the best advice I can give is that you never have too many outlets. Trust me.

The Bottom Line

There’s a lot to consider when thinking about an outdoor kitchen. Odds are you’ve cooked in poorly designed indoor kitchens, especially if you’ve rented more than one apartment. Why do that to yourself in a brand-spanking-new outdoor kitchen? If you’re looking for an outdoor kitchen design in northern Virginia, Maryland, or DC, click that little blue Contact button on the left and let’s talk!