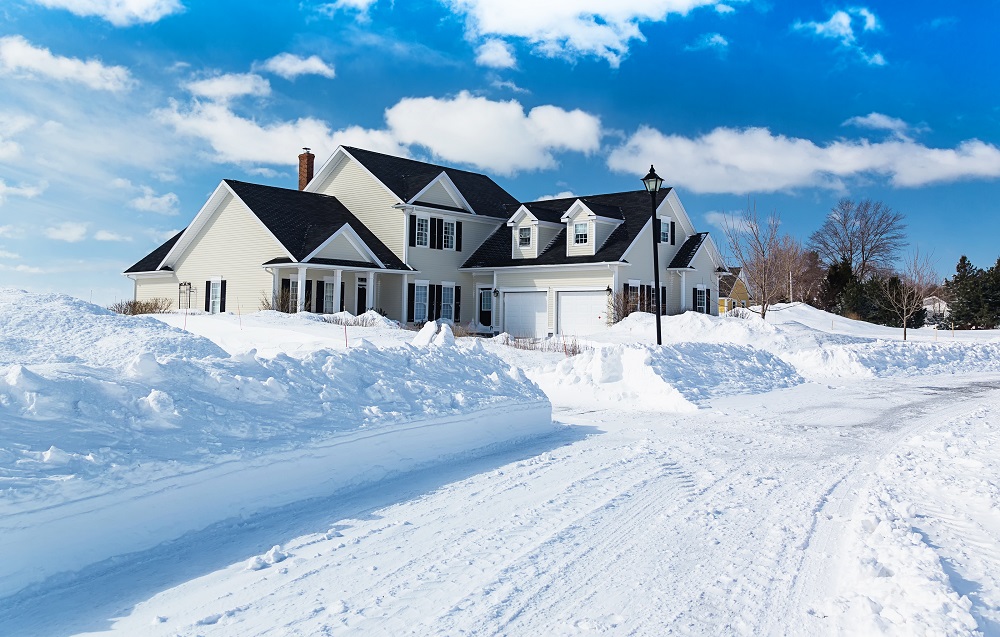
Winter plant damage: watch for these 3 problems

winter plant damage VA

If you’re like a lot of homeowners, you’ve been looking at your landscape plants with a little bit of worry lately. The cold has been brutal. If the Weather Channel is saying that
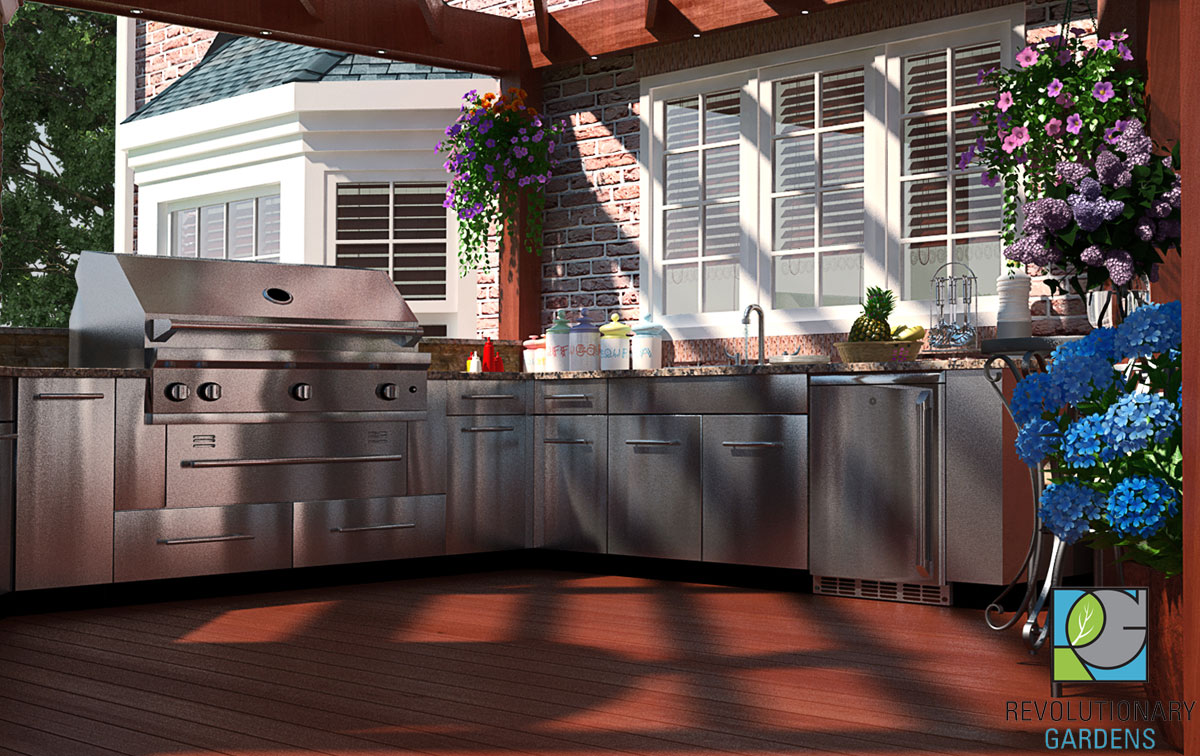
 Valentine’s weekend was “potentially life-threatening cold,” what does that say for the trees and shrubs that can’t come inside to warm up?

As I’m so fond of saying, a big part of landscaping and gardening is just getting out of Nature’s way. In many instances that damage we see will fix itself as soon as spring hits. In others, though, you may have a problem. Here are some things to look for.

Winter plant damage: dessication of broadleaf evergreens

winter-damage-holly

Broadleaf evergreens are prone to winter damage, especially if they haven’t had an opportunity to develop strong root systems. After the screwy winter we had 2014-2015, I won’t do fall or winter plantings of broadleaf evergreens any more. Here’s why: the plants have these wide leaf surfaces that let the wind and sun suck moisture away mercilessly. If the plants don’t have established root systems they can’t replace the moisture and they dry out (dessicate). Affected plants can include:

  • Hollies (especially Oakleaf, Mary Nell, Nellie Stevens)
  • Southern Magnolias
  • Laurels
  • Rhododendrons and azaleas
  • Aucuba

Winter plant damage: freeze damage to crape myrtles and figs

Last year we saw damage on several crape myrtles that didn’t become evident till the trees leafed out. On a multi-trunk crape myrtle, one or more trunks failed to leaf out. On closer inspection we saw numerous suckers coming up from the base and violent-looking splits in the wood just above the ground. In talking to our consulting arborist we learned that this is not an uncommon issue here in northern Virginia.

We saw similar issues with fig trees. For many varieties of fig, northern Virginia is sort of marginal in terms of safe planting range. Last winter saw many figs die all the way back to the trunk. Luckily figs are vigorous growers so as soon as spring hit they started bouncing back.

Winter plant damage: critter damage

deer-damage-arbs

Is it a coincidence that “deer” is a four letter word? I say no. Deer are a problem for many gardeners across the DMV and the problem only gets worse in the winter. If they run out of food to browse – or it’s buried under snow – your plants may make the menu. If all of a sudden your shrubs seem a lot smaller, or you see fresh wood at the ends of the branches, you may have inadvertently helped feed all creatures great and small. Deer are a prime culprit, but so are rodents, especially when it comes to bark.

What can you do about it?

Do you need to freak out or will your plants be ok? It all depends on the amount of damage and the strength of your plant. It’s always darkest before the dawn, and winter damage always looks the worst before spring. What I tell people is that for the most part, let the weather warm up. Let life start flowing back into the plants, and see what happens. If you’re really worried though, take a pic and email it to me. I’m always up for talking plants.

Avoid these 3 outdoor kitchen design mistakes!

Estimated reading time: 7 minutes

Outdoor kitchen design is a lot of fun, but it’s also easy to make some pretty serious mistakes along the way. No matter what your outdoor kitchen has to work well for you. Awkward angles, nowhere to set things down, all these can contribute to a huge problem that will keep you from loving your Virginia outdoor kitchen design – and we can’t have that, can we? Here are some pitfalls you can avoid pretty easily.

Avoid these 3

Outdoor kitchen design mistake #1: designing the size and shape of the space before figuring out the function part

I just spent a good deal of back and forth helping a homeowner on Houzz with her outdoor kitchen design. From what I could gather, the builder created a space on her patio for an outdoor kitchen, but there was a problem. Rather than basing the size on a set of criteria and a kitchen design, the builder created a rather arbitrary space. It was a roughly 40” x 72” rectangle, which wouldn’t be too bad, except it’s surrounded on three sides by walls. Yikes.

And of course the homeowner had a huge wishlist, because outdoor kitchens are awesome and we always want everything cool. So in this space she wanted a 30” grill, a double side burner, a sink, and a pizza oven. There’s no way. There’s a really easy way to avoid this problem, if you follow these simple steps:

  1. write down the list of all the appliances, cabinets, and accessories you want to have in your kitchen
  2. note the width of each item
  3. next, consider the type of construction your outdoor kitchen will be. For example, a masonry kitchen generally needs a minimum of a 4” block between appliances to support the counter and the appliance (6 or 8” is better if you’re doing a stone veneer).
  4. add in the counter space you’ll want for different functions. I always shoot for at least 18” next to the grill for setting plates, tongs, basting brushes, etc. Do you want to prep outside as well? That’s at least a three foot section of counter.
  5. All it all up. That’s the length of your perfect kitchen.

Now, what usually happens is these numbers add up to something insane like 30 linear feet of kitchen. Some accessories can stack, some can’t. Do these first to shrink things. Still have a huge kitchen? Start prioritizing appliances and accessories until you can fit your space constraints. Or your budget constraints, which leads us to:

Outdoor kitchen design mistake #2: going in with unrealistic notions of cost

Let’s be frank: outdoor kitchens can get really expensive. Unless you’re doing all the work yourself it’s probably safe to say you’re not getting one built for under $7-8,000. Where do the costs come in? Let’s look at the components:

Outdoor Kitchen Haymarket VA

The structure: What is your outdoor kitchen built with? You can have your outdoor kitchen built with masonry block on a footer, it can be built from studs anchored to the patio and covered with concrete board, or you can even build your kitchen using stainless steel outdoor cabinets (we sell Danver cabinets, which are amazing). Installed, you’re looking at anywhere from $500 to $1500 per linear foot just for the structure of your outdoor kitchen. That can add up quickly!

Counters: What do you want to use for your worktops? Granite is the most common counter material, but we’ve also used concrete, flagstone, brick, tile, and composites for outdoor kitchen counters. Low end granite starts around $45-55 per square foot installed and can go up from there. Some flagstone counters can be significantly less, but keep in mind that flagstone is much more porous than granite and demands frequent sealing. Ever seen the grease stain from a burrito become a permanent part of a counter? I have.

Appliances: Once you’ve built your outdoor kitchen design, you need your cooking appliances. What do those cost? Here’s a quick rundown:

  • grills: a built-in grill typically starts at around $1,800 and goes up from there. My most popular 36” grill is right around the $3,000 mark.
  • side burners: single burners generally start around $400, double burners are closer to $500, and power burners are about a grand.
  • refrigeration: just shoving a fridge outside doesn’t make it an outdoor fridge. An entry level Fire Magic outdoor refrigerator with locking door is $699. A Summit 2-drawer fridge is north of $2,000.

Storage and accessories: If you’re not using Danver stainless steel cabinets for your outdoor kitchen design you’re going to need access doors, drawers, and cabinets. A single access door for your grill starts at around $160, a 3-drawer unit runs $800-900, and an outdoor trashcan is in the $500-900 range depending on features.

virginia-outdoor-kitchen-design

Can you go cheap on components? Sure, but keep in mind that everything you install has to stand up to summer and winter, sun and rain and snow, heat and cold. Built-in appliances and accessories should give you years of trouble-free use. If you’re on a budget, talk to your designer about how to phase in your purchases. It’s not always practical but it can be,

Outdoor kitchen design mistake #3: not planning the infrastructure

In this case, infrastructure means everything needed to run the outdoor kitchen: power, lighting, plumbing, gas, etc. Since most outdoor kitchens are built on a patio you don’t have easy options for adding utilities later. That means you need to think about three things:

  1. what utilities will I need now and in the future?
  2. where will these utilities enter my kitchen?
  3. where will these utilities go under the patio?

What utilities will I need for my outdoor kitchen?

You can run your grill and burners off a propane tank under the counter, which is the simplest choice. Obviously you’ll need to remember to check the fill level, and ideally keep an extra tank around so you don’t run out during a party. You can also run your grill off of natural gas or, if your home runs on propane, you can use the house supply for the outdoor kitchen. Either way you’ll need to provide conduit for the gas lines and have the installation approved by your city or county authority.

outdoor kitchen design elevation

Electricity is critical. I’ve never heard someone say “I have too many outlets.” You’ll want outlets in the wall or backsplash for blenders, charging phones, and more. You’ll also need dedicated outlets for the following items (which is easy to forget):

  • some grills (for the igniter)
  • electric warming drawers
  • electric induction side burners
  • refrigerators and ice makers
  • icemaker drain pumps (if needed)

When possible, I like to run a subpanel out to the new kitchen. By the time you account for everything above, then add in outdoor audio and video, you’ll need a lot of circuits,

Plumbing is a challenge with outdoor kitchen design and the viability of plumbing your kitchen depends on your municipality. In some cases you can run the lines from the house with no issues, but in other cases you’ll have to pay a large “tap fee” to put what is, in the eyes of the code office, a whole new residential kitchen into their system. So it’s not just important to work out the how and where of the plumbing, you need to make sure what you want to do is legal.

Where to place your utilities

This is where having a design is so important. If you have an accurate, scaled drawing of where your outdoor kitchen design will go, you can decide where the utilities will come up out of the ground. You have a little wiggle room when it comes to moving around gas, power, and water supply lines inside your outdoor kitchen, but you’ll want to be as close as possible for the drainpipe.

How to avoid outdoor kitchen design mistakes

The easiest way to avoid outdoor kitchen design mistakes is, of course, to call on a designer! That’s what I do. Whether you’re a homeowner or a landscape contractor, I can design your outdoor kitchen project to give you what you need. Contact me today to learn more!

How to build a segmental retaining wall

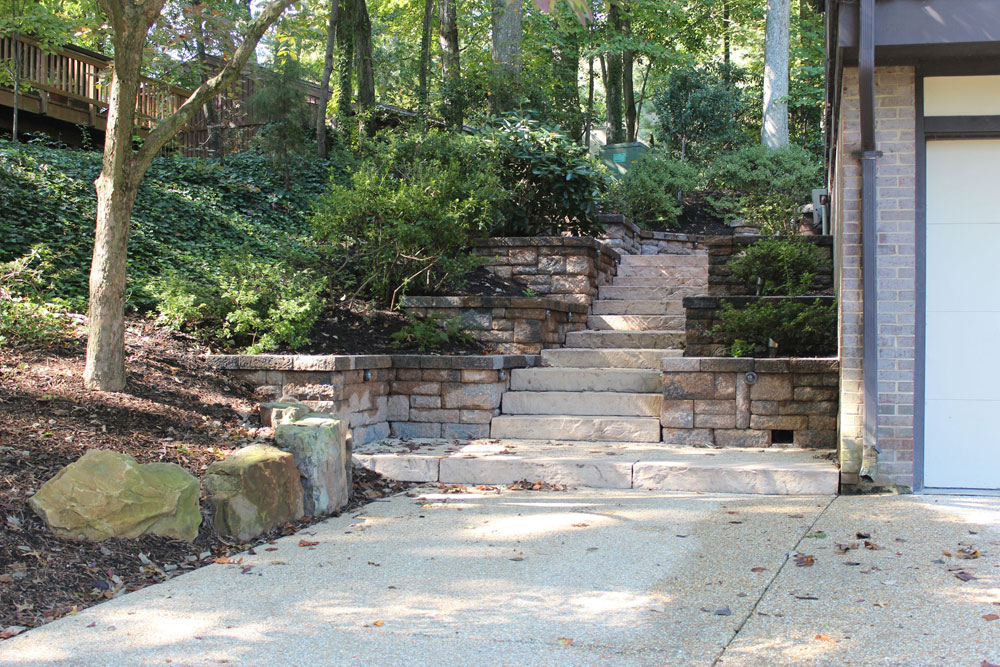
I try to avoid walls where possible, but sometimes you just don’t have a choice. Segmental retaining walls can be a great choice because they don’t require a footer all the way to frost depth, they don’t require mortar, and even if access is tight you can carry the blocks one or two at a time into the site. I would know – we did a job like that in California where we literally spent an entire day carrying an 80 lb block in each hand from the driveway, along the garage, and through the gate and up the stairs past the pool. Who needs the gym?

Retaining-Wall-Reduced

Segmental Retaining Wall Construction

Segmental walls are simple in theory but demand planning and precision to do them right. They require that the appropriate amount of wall is buried, the footer is the correct size, and getting the first course level is critical to a successful wall. Always follow the manufacturer’s installation instructions; these are just general guidelines to help you get started. This post is not intended to serve as installation instructions.

1. The footer

To begin your wall, you’ll need to dig down for your footer. For the purposes of explanation let’s say you’re building a 24″ tall wall. The leveling pad (essentially your flexible footer) should be at least 6″ thick. Typical manufacturer instructions say to bury at least 10% of the height of your wall, or no less than 6″ of your wall. So 10% of 24″ is 2.4″, meaning a minimum of 6″ of the wall needs to be below grade. Therefore you’ll dig your footer 12″ down.

What if you’re building on sloped ground? You always want your wall to be perfectly level. Do not follow the grade with your wall! To accommodate a slope, this will likely mean stepping your footer down with grade. In other words, in this example with a 24″ wall, your footer should always be no less than 12″ below grade. Any time it would be less than that, you dig down the height of one course of block. See the example.

Stepped-Retaining-Wall-Footer

To determine the width of your trench, it should be no less than the depth of the block (front to back) + 6″ to the front + 12″ to the back. Isn’t that a lot of digging? Sure is, but it’s less effort than skimping while building the wall and having to redo it.

Once everything is properly excavated, you’re ready to start adding stone for the footer. First follow your manufacturer’s recommendations for laying in geotextile fabric, typically along the bottom and back of your excavation. Then add your 21A stone, also called crusher run, ABC stone, or 3/4″ minus. What  you want is a stone that’s a mix of particles ranging from fines up to 3/4″ in size. Compact your stone with either a jumping jack or a vibratory plate compacter. The more smooth and level you can make the bedding layer the easier the next step.

2. The first course

The first course is critical. It has to be perfect or you’ll be fighting corrections the whole rest of the wall. Set your blocks, making sure that each block is level front to back and side to side. As you add adjacent block, use a string line or any other means of ensuring your first course is level. Once the whole first course is in, follow the manufacturer’s instructions to add the 4″ drainage pipe behind the wall. Backfill over and around this pipe with #57 stone (3/4″ clean stone). Any cavities in the block also get filled with #57s.

3. Subsequent courses

Clean any stone, dirt, or debris from the top of the blocks in place. Install pins or connectors as determined by the manufacturer and set your next course. Repeat to bring the wall to the appropriate height, backfilling with #57s (3/4″ clean gravel) as you go.

4. Install the caps

Wall caps can make all the difference between a wall that’s just ok and one that has a clean, finished appearance. Set your caps in place with the construction adhesive recommended by the manufacturer or your local supplier where you bought the block. Liquid Nails and other general construction adhesives will not hold up long term.

What about geo-grid?

Your wall installation may require geogrid at intervals to help create a strong, solid wall. Follow the manufacturer’s instructions very closely as geogrid can be critical to preventing wall failure.


Thumbnail

It takes a lot of planning to build a segmental retaining wall that lasts but it can be a very DIY-friendly project. Looking for help on the planning? Download my FREE segmental retaining wall planning worksheet. It lists out what materials you need and how to perform these vital calculations. Fill out your information below to get your worksheet today, and to sign up for my email newsletter.


Dave versus the snow plow

Do kids still do chores? I feel like I never see anyone younger than me shoveling in our neighborhood. When I was growing up, the understanding was that part of why I was there, and allowed to continue being there, was to do work around the house. In the winter that included shoveling the driveway. I mostly enjoyed it, too.

I’ve always had a vivid imagination so it was easy to slip into daydreams while doing the boring and repetitive work of clearing our small (50 feet x 20 feet) suburban driveway. There was also just something satisfying about creating neat edges and sharp corners. I had a very particular way of clearing the driveway, too. Two strips across the face of the garage, two strips from the garage down the centerline of the driveway to the street, then each half of the driveway was subdivided into 10 foot x 10 foot squares. You think that’s intense? You should see how I eat a Twinkie.

As with every epic story, however, there was an indomitable foe.

A freshly plowed road in America suburbia after a snow storm.

It would start, inevitably, as I was clearing the last remnants of snow from the foot of the driveway. First came a rumbling that I felt more than heard. Then individual sounds made themselves known: a hardened steel blade running over asphalt, the throaty roar of an engine straining to move chained wheels over the slick roads, and finally the whoosh of flying snow. In a matter of seconds the town plow truck would round the corner and shoot a grayish-white stripe of ice and dirty snow across my freshly cleared driveway, disappearing up the hill as quickly as it appeared.

It always made me furious. I knew that the plow driver was just doing his job, that this was not a personal attack against little David Marciniak, so my anger wasn’t directed at the plow driver. Rather, it was the at futility of the whole thing. Yes, even as a child I was full of existential angst. Why wasn’t there a better way? I set out to find a solution to this vexing problem.

My first instinct was to just keep the plow driver away from the end of our driveway. I had seen roadblocks used on the Dukes of Hazzard and that seemed like the logical place to start. So I dragged my dad’s sawhorses out of the garage and set them up to keep the plow off our side of the street (in hindsight I was given a tremendous amount of freedom from oversight as a kid). I was roughly awakened the next morning and sent out to shovel all the snow the plow left in the road when the driver swerved around the barricades. And the big strip of snow and ice chunks in the middle of the street. Clearly this was NOT the answer to my problem.

I spent a lot of time thinking of better ways to solve my plow problem. Just in time for the next storm, inspiration struck me. The plow is taking snow from down the street and carrying it to be deposited across our driveway, I reasoned. So if the plow doesn’t have any snow to pick up before our driveway…

My dad was a smart, patient, soft spoken practical man. He also had a keen, dry sense of humor, which is why I can picture the following exchange that may or may not have happened:

[Scene: my parents standing at the window, watching me shovel our side of the street all the way down to the neighbors’ driveway]

Mom: why is David shoveling the whole street?

Dad: I think he thinks that’ll keep the plow from pushing snow across our driveway.

Mom: shouldn’t we –

Dad: let him go. He’ll sleep really well tonight. And he’ll learn something.

My plan? It didn’t work. Eventually I figured out – after one more attempt, this time shoveling about 300 feet of the street – that cleaning up after the plow was just one of life’s inevitable frustrations. I had fought the good fight, but it was not mine to win.

It sure looks like I’ll be contending with the plow-driven frozen detritus this weekend. At least as an adult, I had the resources to go out and buy a snow blower. I’m actually excited to try it out!

If you’re in an area impacted by this impending blizzard, please stay safe, please stay warm, and I’ll see you on the other side of the storm!

Protecting your landscape from winter storm damage

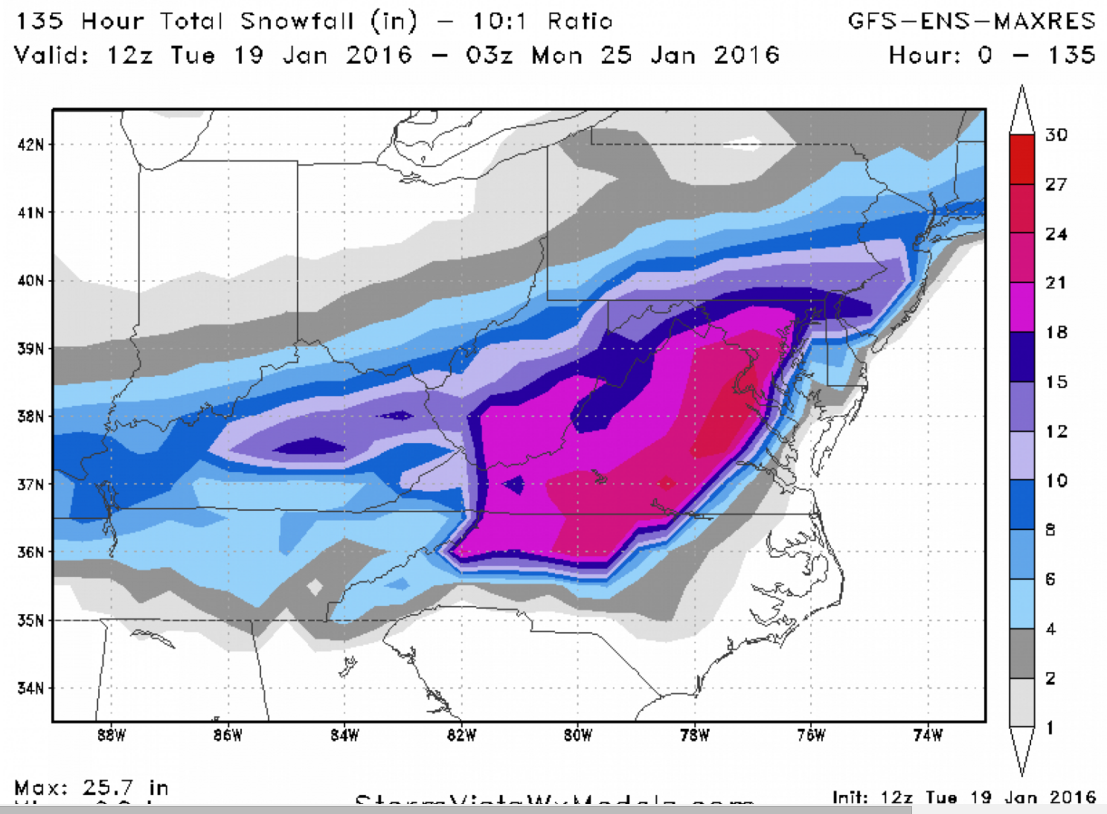
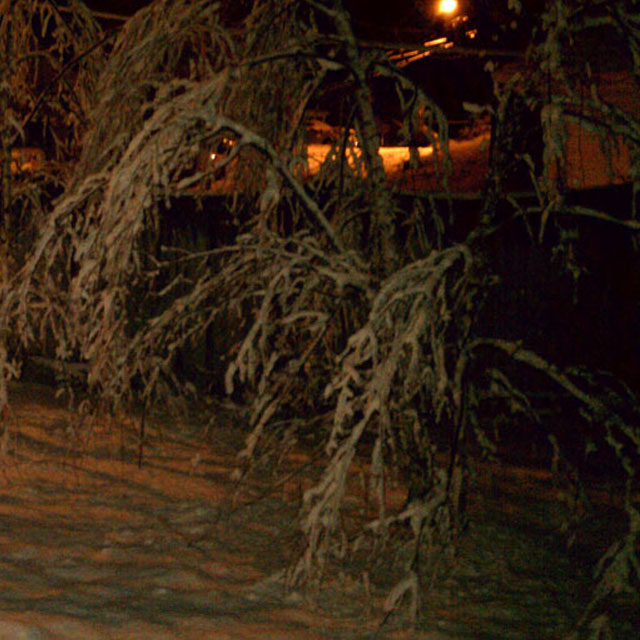
Winter storm Jonas (why are we naming them again?) is barreling towards us, and that’s caused a number of friends to send me panicked texts and Facebook messages like “will this destroy my new plants?” and “help me save my trees!” I figure if they have questions, maybe you do too. Here’s what you need to know to prevent landscape winter storm damage.

Winter Storm JONAS

Protecting your plants from winter storm damage

Snow and ice damage to plants was pretty widespread after Snowmageddon a few years ago. There are some trees and shrubs that are particularly vulnerable to this sort of damage. A great example is arborvitae – the multiple delicate, vertical branches are susceptible to getting weighed down and flopping apart, resulting in a “split” appearance to the plant.

Since a branch is weak but many branches are strong, you can essentially “splint” the branches with one another. Using something that won’t cut or dig into the bark (I like wide tie-down straps), lash the branches together ⅔ of the way above the crotch. Just be sure to untie them once the danger has passed, because if you leave them tied up going into spring it can girdle and damage the plant.

Winter-storm-damage-trees

If your trees and shrubs do droop and bend with the weight of the snowfall, don’t just run out and bang the snow off of them. The sudden drop in weight will cause them to try and snap back into shape, which may cause more damage than if they slowly eased back into shape. Remember this: plants have been surviving winters without us knocking snow off with brooms for thousands of years. Trust Mother Nature – she’s smarter than we are.

Protecting your hardscape from winter storm damage

It’s rare that the DC area sees the type of light, fluffy, powdery snows they get in Colorado. Wet snow + melting + refreezing = lots and lots of slip and fall potential. As a result, you’ll likely end up salting your walks and steps. But is your salt bad for your investment in hardscapes?

Winter-storm-damage-landscape

Aggressive, magnesium-based ice melt products can damage concrete and stone surfaces. If you have a basic asphalt or  concrete driveway and path and you don’t really care what happens to it in the long run, knock yourself out – salt away with the big guns. But if you want to be sure that you’re not pitting or staining the surface, consider calcium based products. Rock salt is also considered safe by many manufacturers, but be sure to check and see what the makers of your paving products recommend.

After the storm is past

If you still end up with damage to the landscape – from snow, plows, ice, or whatever – give us a call!  I’m now working closely with a tree guy and landscape specialist and he’ll go as far east on 3 as Fredericksburg, or up to Fauquier, Prince William, and southern Loudoun counties. No matter what, be safe, have fun, and enjoy the snow!

Case study in progress: Landscape master plans and phased construction at my house

Over the years I’ve slowly (and I mean slowly) been chipping away at my own yard. The problem is that it’s happened in fits and starts, at the rare moments where a rise
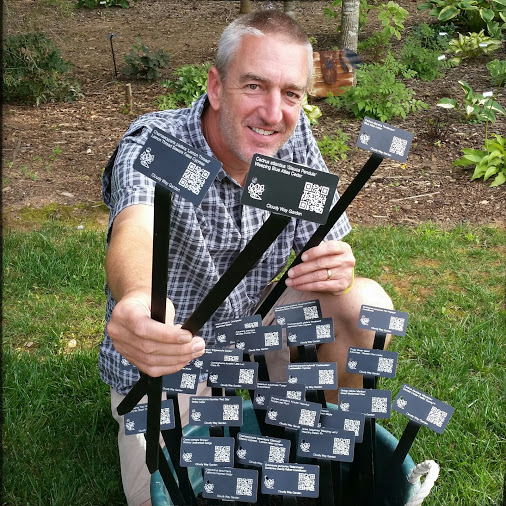
 in free time coincides with an ebb in my back pain AND the occurrence of decent weather. Creating a landscape master plan, and doing a phased landscape install? These things require the planning and thought that I give to my clients. Time to bring that home. Here’s a glimpse into exactly how the process I use works. I’ll be updating throughout the year.

Culpeper Landscape Design Plan

Chopping it up – how to break a landscape into phases

Just like I do with my clients (imagine that! Physician, heal thyself) I’ve followed the following steps to determine a phased approach:

Step 1 – assess my priorities

So the first issue is small, unfinished projects. I have about a day’s worth of grading and smoothing and cleaning up a few small piles.

After that, my #1 priority is getting the upper garden area prepped for spring. Every year we miss the window for peas, dangit, and I WANT FRESH PEAS! Realistically that’s a pretty small project. After that I need to get the patio in. The theory last year was that by ripping up most of the existing patio to use the stones for the upper path, I’d be forced to finish the new patio. Sadly, no. I didn’t. And that meant that MJ refused to sit outside with me, because without stone under her she becomes bug chow.

Doing the patio also means building the waterfall table, so that will be a fun bit of masonry and carpentry. From there it’s adding a few paths to keep puppy paws out of the mud, running a bit of conduit, and plantings. Easy, right?

Step 2 – determine dependencies

This is far and away the most important – and most often neglected – step of landscape master planning and phasing. I’m building a waterfall table on my patio. That means that unless I want to dig up my whole patio in the future, the first thing I need to do is install the footers and blockwork for the table, then dig the reservoir pit and run plumbing. Then the patio can go in. And of course, I’ll need to consider where all the sleeves and conduits and drainpipes need to run. And yes, those do show up on plan.

Step 3 – set an execution plan

This is what makes things so much simpler, right? I’m involved in a lot of big, complex projects and the only way to nail every step is to map them all out. Now that we know what each phase is, we can map out the following:

  • who is involved (me? helpers? electrician?)
  • what materials are needed
  • what prep has to happen
  • estimated timeline

This is the same set of steps we take for all residential builds. Keep your fingers crossed for weather warm enough that I can dig and we’ll start seeing some progress!

Plants Map: because paper gets wet and we forget stuff

I’m always on the lookout for new tech tools, especially ones that could make life easier for my clients. A few months ago I stumbled across Plants Map, a cloud-based way to document and record plants you’ve planted, plants you’ve found and loved, and more. Winter’s the best time to share these new finds with the landscape and garden obsessed, but I’m having the busiest January of my life. What else could I do but punt, and ask Plants Map’s co-founder Bill Blevins for a guest post. Read what Emily from the Plants Map team has to say:


How to get organized in the garden with Plants Map

It’s that time of year when gardeners are poring over seed catalogs, ogling new offerings at plant shows and otherwise dreaming of great things to come in the 2016 growing season.

But how do you keep your seed-buying list organized and separate from the pie-in-the-sky garden wish list you keep adding to? How can you organize all of your garden notes and pictures from last year in a way that allows you to build on them in the seasons to come? And where can you get professional-looking, durable garden signs to add context to your landscape?

Tags Sign Bill

All of those questions were on the minds of Bill and Tracy Blevins when they founded Plants Map two years ago.

Plants Map is a website that allows you to catalog the plants in your garden, the plants you encounter and admire, the seeds you’ve ordered and the big plans you have for your landscapes.

Longleaf Pine

Getting started with Plants Map is easy, and once you start filling out a profile, you’ll be amazed at how many ways you can use this tool to broaden your garden horizons. Here are a few ways to use Plants Map to get an organized start to the 2016 gardening season.

  • Take control of your wish list. Whether you find them in catalogs, magazines or at garden centers, plant ideas are everywhere. The great thing about a plant wish list on Plants Map is that it’s with you wherever you go on your smartphone or tablet. You can snap a picture to add to it on the go or reference it to see if what’s on sale at the garden center is in fact that specimen you’ve been pining over. Read Tracy Blevins’ thoughts on how to set up a great Plants Map wish list here.
  • Easily order garden signs that will impress all the neighbors. Want to instantly make your landscape look polished and professional? Plants Map makes it easy to order durable garden signs and tags once you have documented your plants on the site. These tags are made of aircraft-grade aluminum and come with a QR code that can link anyone with a smartphone to the online profiles of the plants they label.
  • Keep track of what works and what doesn’t. Plants Map allows users to tell the story of their plants (See some great examples in the profile of Dr. Annkatrin Rose.). Start a profile for a plant and you can document your efforts to identify it, journal its journey from seed to maturity and make notes on where it thrives, what pests like it and other lessons learned. When you need to remember what you did last year, just scan your Plants Map tag and read your notes.
  • Explore, learn and connect. Plants Map isn’t just for one particular type of gardener. Schools, universities, botanical gardens, nonprofits, home gardeners and various plant associations have all found a home here. Once you have a Plants Map profile, you can “follow” these organizations, so that every time you visit PlantsMap.com, you’ll see a customized feed of the groups you’re interested in and what they’re up to. You may not have the travel budget to visit gardens in California and Pennsylvania in the same year, but with a quick visit to Plants Map, you can keep tabs on growing seasons in a variety of climates. This kind of exploration helps us all to learn and grow as gardeners.

Spend some time exploring at PlantsMap.com. Maybe start by creating a collection for your 2016 seed orders. If you need any help along the way, a large collection of help articles and direct contact with the team running the site are just a few clicks away.

Plants Map Squares 470

Plants Map was created and is run by avid gardeners who are constantly trying to solve the garden organization problem while also making public landscapes in the United States and beyond easier to explore and learn about. Come join this growing community in 2016.


7 landscape and garden blogs you should be reading

I’m currently working on a project to sort, categorize, and tag all the photos on my hard drive. All 24,585 of them. As a result I don’t read as many blogs as I’d like, but there are a few that I do still like to keep up with. If you’re looking to learn some cool stuff about landscape design and installation, gardening, and assorted coolness, these are worth checking out. Tell them I sent you!

1. DC Tropics

DC Tropics

John Boggan is a botanist and plant enthusiast right here in the DC area. His blog, DC Tropics, is a great resource for those who are interested in pushing their luck and growing tropicals – yes, tropicals – in the DC area. Lots of gorgeous pics, and you may learn something. I know I’ve been amazed at how tough some species of plants actually are.

2. The Garden Professors

Prof

There’s a reason I’m constantly referencing the Garden Professors blog, and linking to their posts on my FB page: they’re awesome. With so much misinformation out there (some of it innocent, some of it by hucksters looking to fleece the unknowing) the world needs an online resource where decisions and recommendations are made using science. The Garden Professors blog is the hero Gotham City deserves.

3. Grounded Design

ground

My writing style and Thomas Rainer’s are pretty much polar opposites. If we were Ghostbusters, he’d be the Spengler to my Venkeman. But on his blog Grounded Design, Thomas does a solid job of discussing natives, perennials, and the state of landscape architecture. Fascinating stuff.

4. Garden Rant

Rant

Reading blogs where you agree with every single post gets boring. Garden Rant is an intriguing blend of information and opinion. I may not always agree with their positions (see: lawn, leaf blowers) but posts are well written and you’ll likely learn something along the way. And one of the Ranters has some fabulous B-movie credits to her name. Who? You’ll have to read to find out.

5. Pith + Vigor

Pith

If you like a very polished, online magazine look to your garden blogging you’ll love Pith + Vigor. The posts have a very lifestyle/shelter mag quality to them, and it’s like standing at the magazine racks at Barnes and Noble, flippy through glossy pages of pretty stuff. And Rochelle’s a heck of a writer to boot.

6. Kiss My Aster

Aster

For starters, that blog name – Kiss My Aster – is epic. And Amanda makes my blog look uptight. What else do you need to know?

7. The Renegade Gardener

Renegade

I’ve loved the Renegade Gardener for years. Or at least I’ve loved his blog. Haven’t met Don in person. Anyhow, if you’ve ever wondered what goes through a landscape designer’s head but they’re WAY too diplomatic (and sober) to say it to you? Now you know.


Are there more blogs out there? There are a GAZILLION! If you think I missed a great one, and as such I’m the world’s biggest idiot, let me know in the comments. If I get enough suggestions there’ll be a part 2. In the meantime, go read more blogs. It’s good for you.

A holiday poem by me!

‘Twas the holiday season and out in the shed

your favorite designer had just bumped his head.

I staggered on out and into the night

when above me there shone a soft warm red light.

Santa_Selfie

It’s Rudolph! I hollered, now feeling no pain,

stopped rubbing my noggin and called them by name:

“On Hosta! On Mahonia! On Compost, on Mulch!

On Ranunculus, Nepeta, and Sedum ‘Deep Gulch’!

I know I’ve forgot one but what can I do?
But simply point up and call out, Hey you!”


The dog was freaked out and was barking away

as there on my roof, a lipstick red sleigh

perched on the peak for my eyes to see

and just then the old elf slid down the chimney.

stciker

I crashed through the back door with one thought in mind,

could Santa be prodded with cookies and wine?

To give me the gift that I’ve wanted for years,

A real compost cannon with steampunkish gears?

Cookies

I ran to the den to go plead my case

when I stopped short at the smile on Santa’s wise face

“I can’t give you a cannon, son, for without a doubt

you’re the type of moron who’d shoot his eye out!


But since you’ve been good and brought beauty and light

to all of your clients, I promise this night

your seeds will all sprout, your flowers will bloom

the beauty of Nature will fill outdoor rooms

I bring people joy just one night a year,

now here are the tools to spread much more cheer!”

Santa_and_Bonnie


He set down some boxes and before I could blink

he shot up the chimney, quick as a wink!

I trudged up the stairs, happy but worn,

to sleep like a rock until Christmas morn.


I tell you this story to get this off my chest

with every last one of you, I’m truly blessed

My wish now is for you to be of good cheer,

Have a Happy Holiday and a Happy New Year!

Case study: An Alexandria landscape design all about the dog

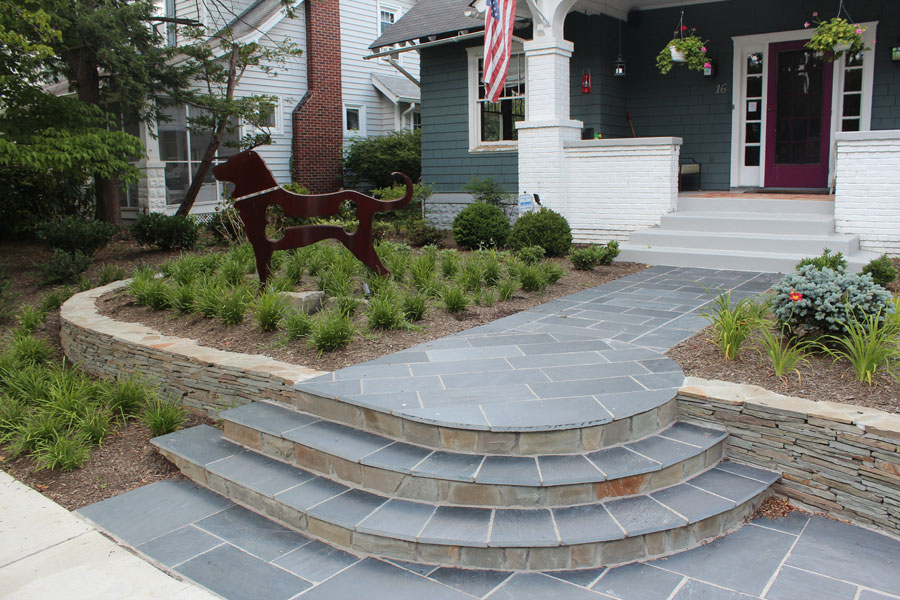
This was a great Alexandria landscape design project. Sometimes you roll up to a new potential client’s home and you see something that makes you say, “we’re totally working together.” That was the case with this project. As I drove slowly down the street, looking for the house number like a pizza delivery guy in a blizzard, the giant Cor-Ten steel dog in the front yard told me I was in the right place.

Alexandria Landscape Design before construction

The client brief

The client’s goals for this Alexandria landscape design project were pretty straightforward:

  • all eyes on the dog – it’s the focal point
  • eliminate the grass in the front
  • deal with the grade change from the lawn to the sidewalk
  • new front walk
  • make it all blend with the awesome Craftsman home

After getting the signed design proposal I took measurements and a ton of photos and got started.

The design

Alexandria landscape design plan

Instead of the usual narrow front walk that most of the homes in the neighborhood have, I wanted this Alexandria landscape design to create a broad, welcoming entry. The wide front porch of the Craftsman home deserved it. So I designed a generous pad flush with the city sidewalk to funnel guests in to the walk. Pushing into the yard like this necessitated a small retaining wall; I opted for a stacked stone wall, both for aesthetic reasons and for budget.

Alexandria landscape design progress

The finished product

The end result was a design that the homeowner loves. Using liriope as a groundcover creates a low maintenance alternative to grass, and the plantings all complement the home. Westmoreland stone was used for the sidewalk, as I wanted a darker color that would look like it had been in place longer. Most importantly, the dog sculpture (by artist Dale Rogers, if you have to have one for your yard) is front and center in this Alexandria landscape design project. Plants + stone + steel dog = a great project. Who knew?

Alexandria-Landscape-Design-Final