One That Got Away: Challenging Retaining Wall in DC

One of my favorite things to do on this blog is to profile recent projects. It’s a fun opportunity to show what’s possible, and maybe brag a little. Hey, my clients let me create some great landscape designs for them!

DesignerIsIn

As I was thinking about a recent sale I didn’t close I realized I should blog about it as well. After all, what killed the deal were the realities of the site and the budgetary challenges they created. There might be something to learn from this, especially if you’re planning a DC landscape design project of your own.

The site: A rowhouse in DC. It’s in a hilly neighborhood off of Rock Creek Parkway and there is a HUGE amount of elevation change between the street and the front porch.

All the homes in this neighborhood have a 10-12 foot tall stone retaining wall right at the city sidewalk. This client’s wall had deteriorated, so last year he had the wall rebuilt. Such a wall requires a huge cantilevered footing, which meant digging way back into the hill. Because the wall was being built right at the city sidewalk all excavated soil was hauled off site. The new wall was built, including a 4 foot wide set of curved steps, and only some of the removed soil was brought back.

The project for which I was called: Prior to the new wall’s construction, the homeowner had an 8-10 foot wide level piece of lawn in front of his porch. Since the wall builders didn’t bring all that soil back, it now plunged off like a ski slope. The homeowner, therefore, wanted one or two natural stone retaining walls built behind the big wall to level off the yard, new landscaping, and new low voltage landscape lighting.

Wowsers. The client wanted to have a sense of the budget, so my masonry contractor and I sat down, had some coffee, and talked it over.

The challenges:

– Access. Parking in DC is a challenge, and with the sheer wall right at the sidewalk there would be nowhere to stage materials. Everything would have to be hand carried up the steps and staged at the top of the lowest wall. If the steps were a straight shot, we could have laid boards as ramps and wheeled materials up – but that wouldn’t work on the curved steps. Getting concrete up to the wall footers would require a pump truck.

– Work area. The only space to stage materials and mix mortar is a small flat pad at the top of the new retaining wall. That means a lot of shuffling things around every day, reducing efficiency.

– Backfilling our new walls. Again, the material that was here originally never came back. This means that we would need to bring in between 40-60 cubic yards of fill dirt and topsoil. To put that in perspective, a full load in a standard tri-axle dump truck is 12-14 cubic yards.

So how would we get this quantity of soil up to the top of the site? As mentioned above, wheelbarrows were out. Hiring a ridiculous number of laborers and doing a bucket brigade would be just… ridiculous. We settled on having Sislers Stone put the soil in super sacks (sturdy bags that can hold a ton of bulk material), truck them to the site with a flatbed, and lift them into place with a rented crane. Logistics!

– Safety. Any time you have a retaining wall on a slope above another retaining wall, there’s a possibility that it will exert forces on the wall below. I let the client know that as part of the landscape design process I would have a structural engineer look at my drawings, and if he felt it required his involvement that would be an additional cost.

After all this, the landscaping and lighting were a small portion of the project cost, but it all added up. In the final analysis, we figured it would cost a minimum of $30,000 to complete the project. It was more than the homeowner wanted to spend, so we’ll hopefully revisit it later.

The unfortunate thing is that this is a $30,000 landscape installation project that could have been avoided, or at least reduced. The company that rebuilt the wall clearly didn’t work off of detailed plans or specifications. I know this because the client told me they built the steps in the wrong place, and there was clearly no communication up front about the soil hauled off site being brought back. This is yet another case where starting with a landscape designer – someone who could create a detailed set of drawings and a complete scope of work – could have saved thousands of dollars.

I would love to save you thousands of dollars! If you’re looking for a landscape designer for a project in northern Virginia, DC, or Maryland, contact us for a consultation!

Who cares for your landscape? That’s the last step in the design!

If I had a penny for every client who included “I want a low/no maintenance design” as part of their wish list, well… 170 pennies are in a pound, so I’d have a stack that weighs more than my biggest cat. I get it. We’re all busy, whether it’s work or kids or church or all of that, and we want something that will look as good in two years as it does today. But wait, landscapes don’t work that way.

culpeper landscape design

If you have an interior designed for you, maintaining that space comes down to keeping it clean and tidy (and maybe the occasional fresh coat of paint). If your landscape was well designed, it doesn’t look its best the day we pull off. It looks its best a few years down the road when the plants have all started to fill in and mature and create that beautiful, layered, effortless look. However, the wrong person caring for that landscape can inadvertently keep it from ever reaching its potential. As landscape architect Michael Van Valenburgh stated,

If you leave plant management decisions entirely to horticulturists who remain on the site after you, you are surrendering too much of your design. On the other hand, your design will be ill fated if you don’t collaborate with people who know horticulture. Collaboration—this is the unheralded key to management.

I came up through maintenance, then construction, before coming into design. I feel pretty comfortable designing with the long term in mind and I personally handle the pruning for a few clients because it allows me to guide the landscape in the direction I want it to go. I can’t do it for everyone in the nation, though, which is why I think it’s important to talk about what you’re looking for when seeking someone to care for a designed landscape. It’s not complicated:

  • Knowledge – can they identify what you have?
  • Skill – Do they know proper pruning techniques?
  • Vision – can they tell (by looking at the plans, looking at the landscape, or talking with you) what the goal is and how to get you there?
  • Professionalism – proper plant care is going to take more time than a mow and blow approach. Do you feel confident that they’ll use your time wisely? Can they provide you with a synopsis of what they did after each visit?

Whoever you select will play a large role in shaping your garden now and in the future, so I recommend selecting someone with whom you’re comfortable and with whom you can communicate well. Do that and you should have an easy relationship and a beautiful landscape.

Is your landscape still a great design away from needing a guiding hand to maintain it? Contact me to set up a consultation! I’d love to learn more about your project.


Does great landscape design make us happier?

Ever since starting my landscape design firm I’ve had an opportunity to meet with a lot of people, look at a lot of yards, and have a lot of conversations about how they want to get more enjoyment from their landscapes. There are recurring themes, no matter where my clients are (geographically or economically): they often want a space that they can live in and share with others.

happy family

It was with interest that I learned of a study of the positivity of the English language. Using computer analyses the researchers scored over 10,000 commonly used English words and assessed the perceived positivity of the words. In other words, what are the happiest words in the English language?

If you scroll down through the article, you can click on the link to Table S1 to download a list of the 50 most positive words. Here are some words I wanted to highlight:

  • laughter was #1
  • love was #3
  • celebration was #20
  • music was #23
  • weekend was #26
  • friendship was #34
  • holidays was #36
  • sunshine was #43
  • beautiful was #44
  • paradise was #49

Some of these words, or permutations of these words, come up in my client consultations. Many of these, even if they’re not actually spoken, are a part of how we envision spending time in a space. Celebrating, laughing with loved ones and friends, listening to music in the sunshine in our beautiful backyard paradise… according to how I’m interpreting this study, a beautiful backyard can lead to happy times!

It may sound sappy but what I love about what I do is we’re actually helping people live their dreams. Whether or not your favorite word made the list, I’d like to help you and your family create a space that will make you happy every time you see it. Call me or drop me an email and let’s get started.


Building a timber wall – will it last?

I like to play a game I call underrated/overrated. You can play it with bands, actors, foods, anything you want. Example: underrated/overrated = Hudson Hawk is a brilliant and underrated movie/ Sideways is an incredibly overrated movie that makes me want to guzzle Merlot out of spite. See how it’s done? Please leave your own under/over thoughts in the comments.

A part of the landscape that I think is underrated is the timber retaining wall. There are two objections that I see raised about them: aesthetically they aren’t great, and wood will eventually break down and the wall will fail. Both very valid points. However.

Pressure-treated timbers are typically what you use for a timber retaining wall. The fun fact about pressure treated wood is that it is warrantied – but putting it in continuous contact with the ground voids the warranty. Even so, you can reasonably expect to get anywhere from 10-20 years out of a timber wall. We did a job a couple of years ago where we removed a timber retaining wall so we could install a new Techo-Bloc wall. The existing wood wall was fifteen years old and we expected it to come apart like a castle made of wet Kleenex. Instead it took days of work with demo saws and pry bars. Fifteen years later and the wall was still solid. I was impressed.

Retaining Wall Detail
source: Fairfax County Wall Detail Packet

How do you get a wood wall to last so long? It all comes down to proper installation. I refer everyone to the Fairfax County Retaining Wall Detail packet, because it applies to most cases. You want a solid, compacted gravel footer; you want to make sure that every timber is level and true as it’s installed; you want to use 1/2″ galvanized spikes to hold the wall together; you want to use deadmen as shown to tie the wall into the grade behind it; and you want to backfill appropriately, including clean drainage stone, to keep water from causing the wall to fail. It may not be easy to execute (it’s still a lot of work and it takes skill to do well) but the principles are sound.

“But Dave,” you may say, “that doesn’t address the fact that a timber wall looks like a stack of lumber in my backyard.” Well, fair point my imaginary naysayer. This is why I don’t recommend a timber wall in every situation. If the wall is going to be front and center as someone drives into your property, it’s probably not the ideal choice. If you just need a functional wall  and you won’t often see it, though, a timber wall could be a great way to make room in the budget for something else. In this scenario, we had to build the grade up almost six feet to create a waterfall. Rather than spend thousands of dollars to retain the soil at the back of the falls with a gorgeous stone wall that only the deer and squirrels would see, we used a timber wall.

timber wall behind waterfall

Worried about the aesthetics? This is what it looks like from the house. Yep, you don’t see it.

pond waterfall design in northern virginia

There you have it: the humble timber retaining wall. It may not be glamorous and it may not be a forever solution, but if you need to stretch the budget and can conceal the wall, I hope you’ll at least consider it.

Are you making a major change to your landscape and looking for ways to stretch your budget and still make it look great? I can help with that! Contact me to set up a consultation. I’d love to help you fall in love with your property all over again.


Just Because It Doesn’t SAY It’s Landscape Lighting Doesn’t Mean It Can’t Be

Over the holidays I went to the Leesburg Outlets with MJ and her mom. While it was a little nutty and crowded, I discovered that Jos A Banks actually sells clothes that fit tall guys with Magilla Gorilla arms. That was one bit of excitement.

More relevant to this blog, however, was the discovery of the awesome lighting at the Restoration Hardware outlet store. I love lighting; had I continued my schooling in interior design, that’s an area of specialization that really interested me.

chandelier 1

The thing about landscape lighting is that the goal is to see the effect and not the source. We focus on grazing walls, highlighting objects, playing with shadows, and making sure paths are safe and easy to navigate. We aren’t necessarily looking for a fixture that commands attention, one that says hey! Look at this! What I found were ceiling light fixtures that called out for attention. Any big, open space would be perfect for these, whether it’s a barn, a huge screen porch, or even a patio in a grove of trees, where a stout branch provides support, The possibilities are endless.

chandelier 2

What do we think? Is this something you would do? And one more fixture – how great is this for over an outdoor dining table?

chandelier 3

Three Tips to Being a Plant Collector and Still Having Great Design

The longer you work with people the more you see that there are different “types” of people, and landscape design clients are no exception. There are two types of clients when it comes
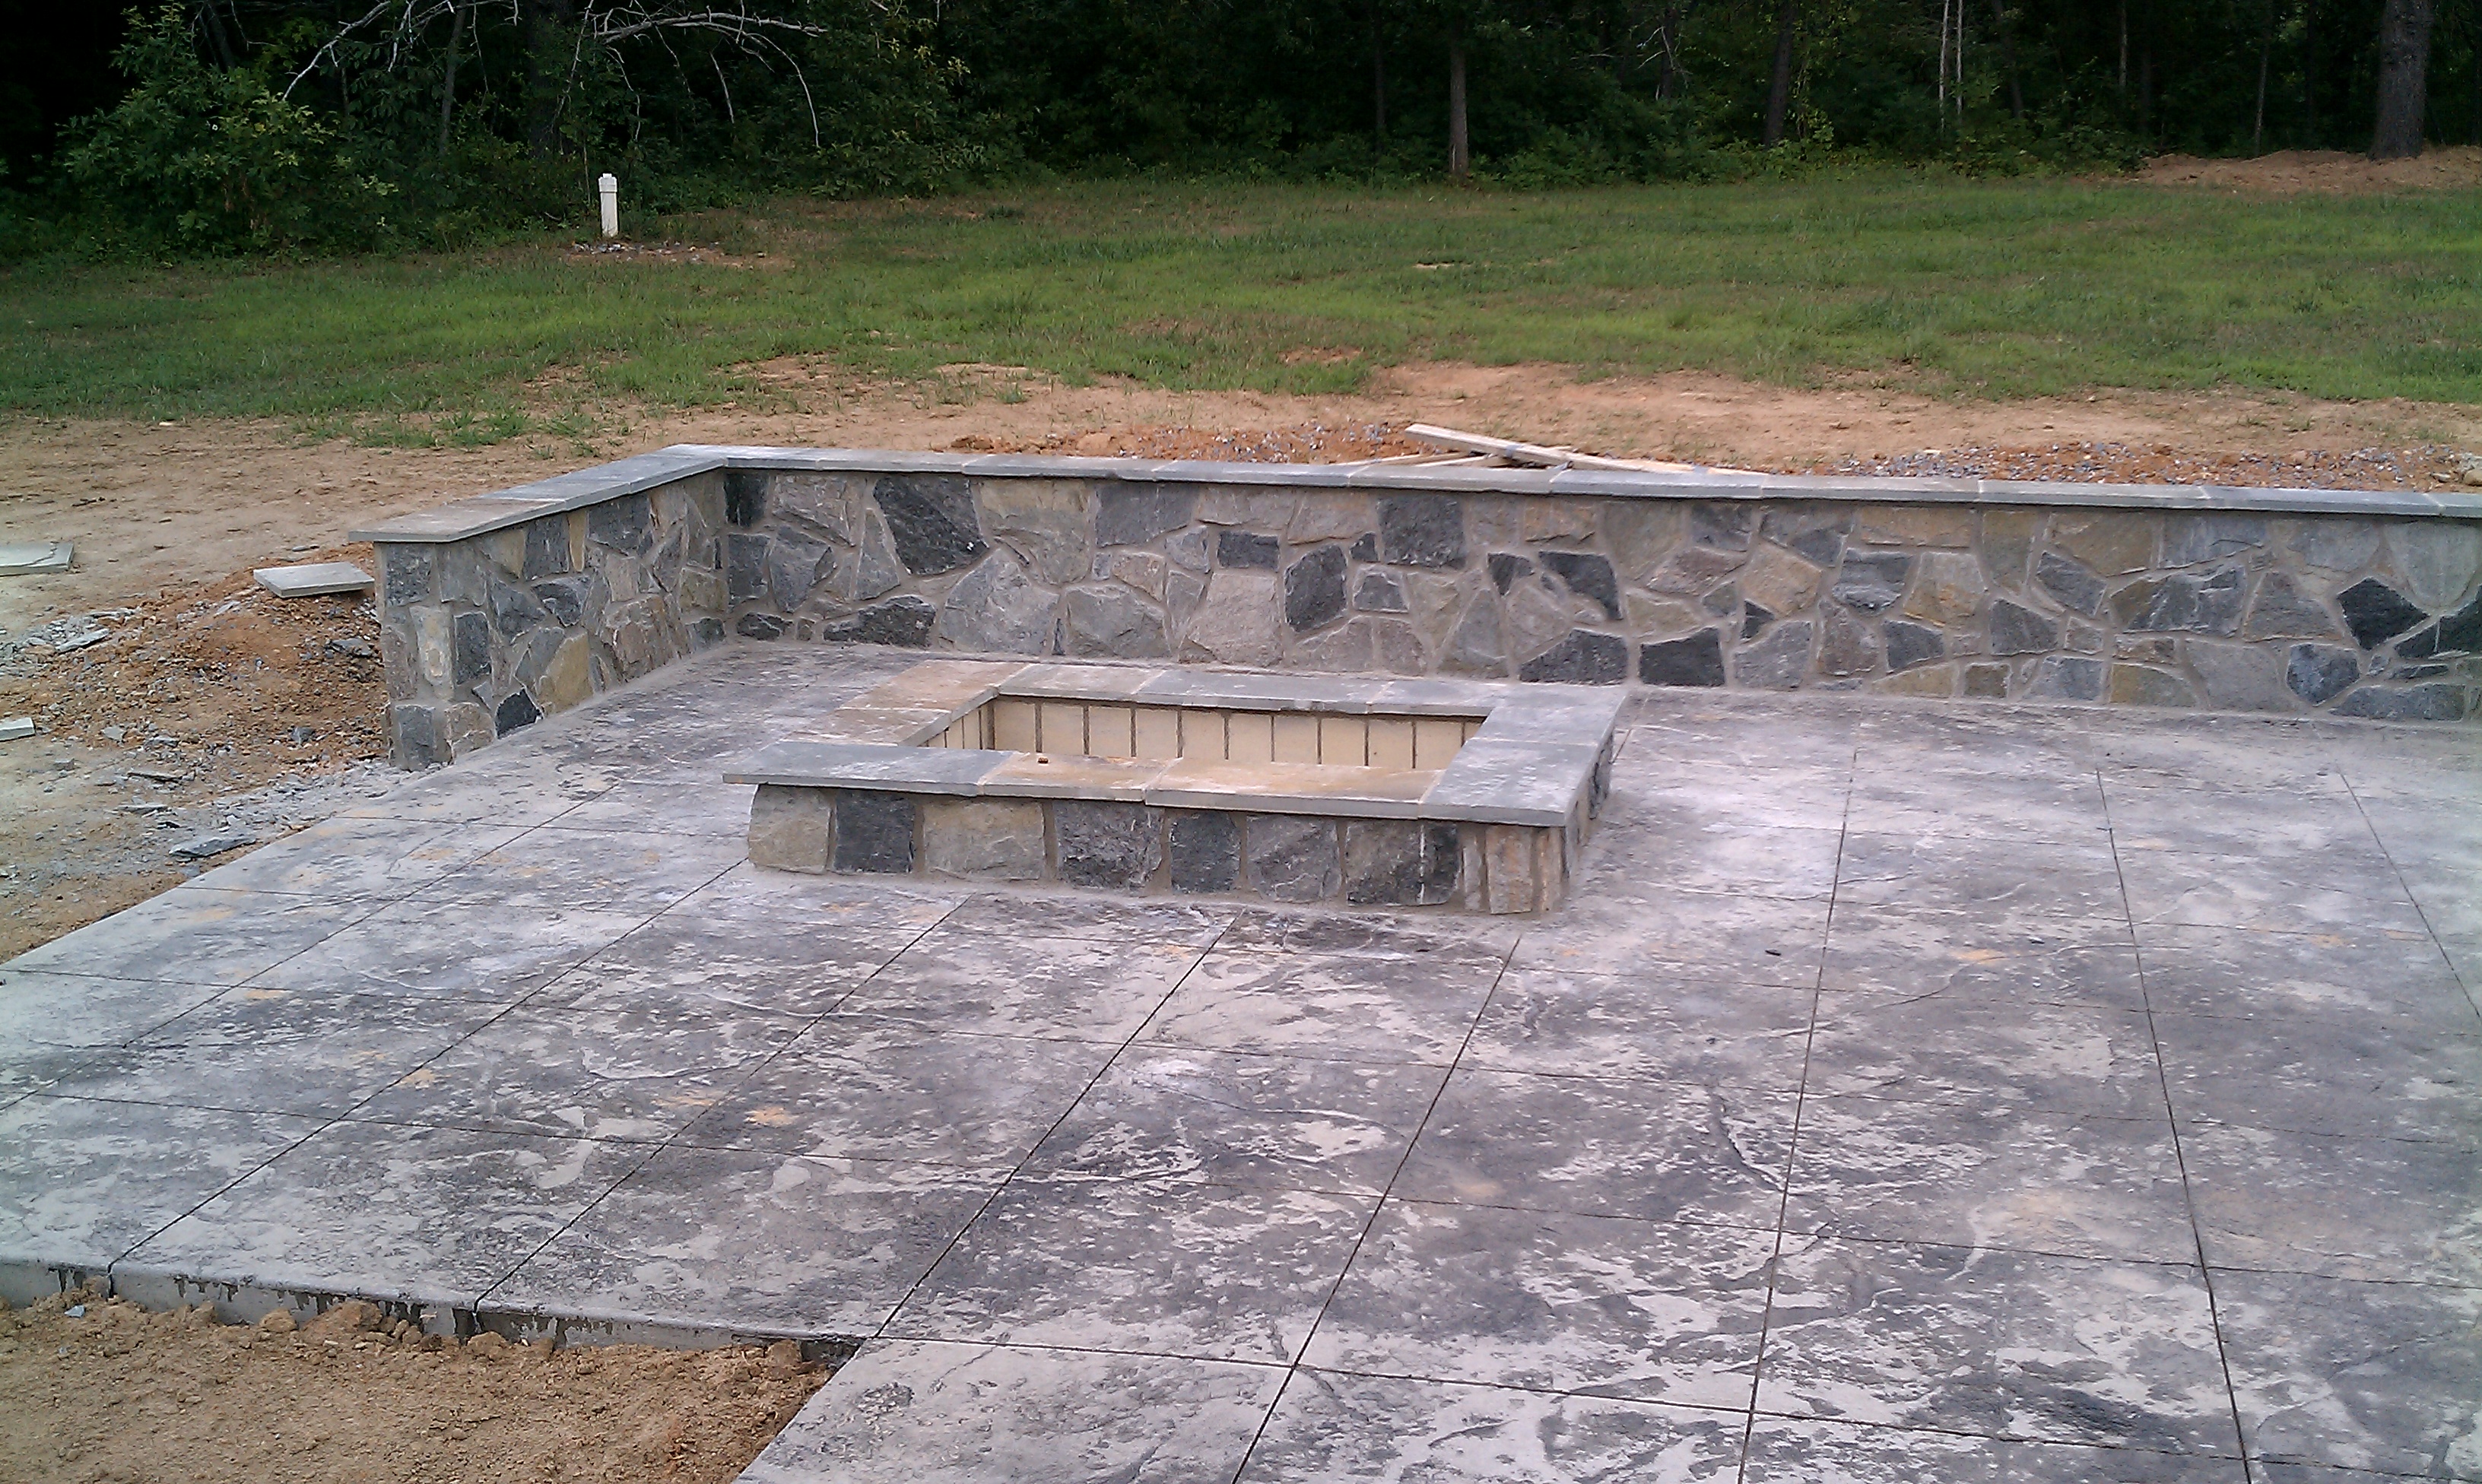
 to plants: the ones who like plants and are generally happy with anything that looks good, and the ones who loveloveLOVE plants and can’t have enough.

The challenge that my plant-collecting clients face is that it’s hard to have unity and harmony in a design where every single plant is different.I get it, I really do. Plants are awesome, and if you watch the sales you can score specimen plants at amazing discounts (a current client picked up 6′ tall weeping evergreens at about a third of what I would pay buying from the grower – no joke). The problem is that unless you’re very fortunate, you only have one yard.

So how do we balance our love of funky plants with a need to not be the crazy cat person of landscaping on our block? Sometimes I find that relating the outside of the house to the inside makes everything clearer.

Step 1: Pick your beige first.

One rule of design is that if everything is an exciting focal point, nothing is an exciting focal point. This is why ruby-colored pillows look so stunning on a gray sofa, why that turquoise blue vase looks great on a black shelf; heck, it’s why the rest of the jazz combo backs off when it’s time for the trumpet solo. In the landscape, my “beige” is typically evergreen shrubs. The dark green foliage of laurels or hollies will make that golden or variegated plant pop. I’ve photographed literally hundreds of landscapes and what I’ve found is that the background plants all blend together to emphasize the foreground plants.

Otto Luyken Laurels (photo taken at La Grange Winery in Haymarket VA)

Step 2: Paint around your featured plants with a big darn brush.

Once you’ve selected your massing plants that create the backdrop, use them generously. If you go to an art gallery you’ll notice that none of the canvases are touching. Rather, each is surrounded by an expanse of (usually white) wall. The more continuous the background is, the more your exciting plants will leap out.

What I find to be the best way to design a yard for plant and/or outdoor sculpture devotees is to design simple yet interesting massed plantings throughout the landscape. I then designate where the “fun” plants will go. I look at it as having built the gallery, painted the walls, and hung empty frames wherever artwork will show the best. This way the client can shop to his or her heart’s content, knowing the exciting new finds will have a home.

Step 3: Exercise restraint.

This is the hard part for any plant lover. Do as I explained in step 2, and know how many spaces you have for new plants. This way you’ll feel comfortable knowing that your amazing find already has a spot. Otherwise, what happens is the garden looks cluttered or the plants sit in their pots for weeks while you try to figure out the perfect space. If you run out of room before you run out of love for plants it may be time to reevaluate your collection.

Sometimes my job is to help my clients through these steps. If you feel like your landscape would benefit from a designer, I’d love to talk to you!

And just remember – even Mozart had to choose!


Travertine Paver Patio Installers in Virginia – What to Know

When I was designing landscapes in Arizona, one option we had available to us was travertine marble tile. These were actual tiles – typically 12″x12″ and less than a half inch think – so they had to be laid in a mortar bed on a concrete slab. Shortly after landing in Virginia in 2005, I started seeing travertine pavers make an appearance.

These are really cool because they’re an inch thick and are laid just like a concrete paver. You build up with a base layer of compacted gravel (21A or crusher run), then use a one inch layer of sand as your bedding layer. Once the pavers are in place they’re compacted and polymeric sand is swept into the joints. That’s it. It’s a beautiful finished product that has the ability to flex and move like a traditional concrete paver patio in Virginia. From the test data I’ve seen online, travertine pavers have a compressive strength similar to concrete pavers and can even be used for driveways!

The biggest challenge I’ve found with designing travertine paver patios in Virginia is making the materials make sense. Travertine in California or Arizona doesn’t look out of place. It can look a little foreign here, though. I recently designed a fireplace, seat wall, and travertine paver patio as part of a winery landscape design project. I used a plum-colored flagstone to tie in with the warm tones of the travertine and the rich reddish colors in the fireplace stone, and I’m quite pleased with how it turned out. All those color theory classes have finally paid off.

I’m starting my next travertine paver patio project this week, and I may have one more in the pipeline as part of a swimming pool project. The travertine pavers are a great product that (unlike concrete pavers and flagstone) aren’t in every other backyard. Making it work requires someone who can integrate this new material in the landscape design while blending all the colors harmoniously. In other words, you need a landscape designer. Contact me to set up a consultation if you’re looking to build a travertine paver patio in Virginia, Maryland, or DC and I’ll be happy to talk with you about it!

Accessibility and Universal Design in the Landscape

When I was studying interior design I was fascinated by universal design. While I don’t trust Wikipedia for everything, their definition nails it:

Universal design refers to broad-spectrum ideas meant to produce buildings, products, and environments that are inherently accessible to both people without disabilities and people with disabilities.

I think universal design is brilliant. Well-done universal design functions well for everyone, and in many cases it’s accessible to everyone without looking institutional. Examples of this inside the home would be showers that look like any other high-end bathroom but can accommodate a wheelchair, or grab bars that match the home’s decor. We can carry these same ideas to the outside.

Keeping paths as level or as gently inclined as possible is one way of making them accessible to as many people as possible. The Americans with Disabilities Act has some good guidelines for this sort of thing, as it’s based on lots of research into what people can comfortably navigate. We can also make these surfaces ADA compliant, allowing wheelchairs to easily roll across them. Asphalt is good, gravel is bad. But what if asphalt isn’t the look we want?

Source: Cell-Tek's company site

There are products out there that can bind gravel to keep it looking natural while still allowing wheelchairs to use the path. Two of these are Gravel-Lok and Klingstone Path. If you’re here in Virginia, you can go to James Madison’s Montpelier (in Orange County) to see what Klingstone Paths look like in person. It’s pretty exciting.

For most other design considerations, universal design outside has many of the same considerations as the inside. Outdoor kitchens can be made usable for anyone, and lighting design becomes even more important for safety and wayfinding at night. If you’re looking to age in place, or you know someone who is, give me a call. I’d be happy to talk with you about design steps we can take to keep the outdoors accessible for years to come.

Understanding Flagstone: Sawcut, Thermaled, and Chiseled Edges

You’ve decided to use flagstone in the landscape. Good call! You may not be done making decisions, however. If the stone will be used in an application where you see the edge of the piece (step treads, wall caps, etc) you’ll have to think about the finished look.

Thickness

The first thing to consider is the thickness of the stone. The typical stone we use for a wet-lay patio can vary in thickness, from a hair under an inch to over two inches. When building steps or a cap, you want to see a consistent thickness of stone all the way across.

Something else to consider is that often a thicker stone will look better. That 1″ thick flagstone can look wimpy. A 2″ piece has a lot more heft to it. In some cases you may want to go even thicker, but just be aware that now you’re looking at significant additional costs.

The Edge – Sawcut Flagstone

The most common edge “treatment” isn’t really even a treatment. The rectangular slabs of flagstone are cut with a giant saw, and you can often see the marks from the blade on the stone. It’s fine, but it’s certainly not an aesthetically exciting finish.

The Edge – Thermaled Flagstone

One of the most common edge treatments (and one that I think looks great) is thermal-treated. This is accomplished by taking a piece of sawcut flagstone, wetting down the edge, and heating it with a torch. Done correctly the water turns to steam and pops off small pieces of the stone, resulting in a smoothly textured and very consistent surface. Done incorrectly, the piece overheats and splits. This is why most stone yards offer to provide thermaled stone.

The Edge – Chiseled Flagstone

Another way of treating the edges of flagstone is to give them a chiseled appearance. It’s another technique that’s simple to describe and more difficult to do: the mason uses a chisel to remove small, evenly sized pieces of material from the edge of the stone until it has a very cool, consistent rock-faced look across the edge. Some companies do this on site, but most get the stone from the stoneyard like this.

When designing with stone there are so many variables to consider. While it seems inconsequential at first, the right edge treatment can make the difference between a good result and a great result. If you’re looking for help achieving that great result, contact me for a design consultation!