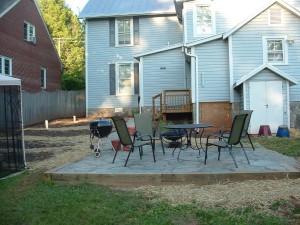
 Building a dry-laid patio is labor-intensive, but can be a decent DIY project if you pay attention to all the little details. The one in the photo is the new one in my backyard. Irregular flagstone wouldn’t be my #1 choice for dry-laid stone just because it’s really hard to get a smooth, even surface, but the stones were free (jobsite leftovers- and sorry, there’s no more left). I think the best stone choice for a dry-laid patio is random-laid rectangular flagstone, like this:
However, the choice is up to you and your budget. Know that retail prices for the rectangular stone range from $7 to $12 per square foot, depending on where you are and the type of stone. Irregular flagstone is sold by the pallet; a ton of irregular flagstone covers 100-120 square feet on average, and can start around $450 per ton.
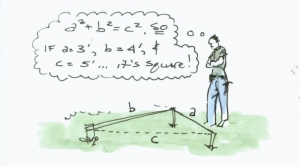
The first step is to design the patio, so you know the size and shape. For simplicity’s sake, we’ll discuss a 12ft x 12ft square patio, constructed with random-rectangular flagstone. Simple shape; lay it out in the field with marking paint. If you want the patio to be perfectly square, your best bet is to pull string lines and adjust them until you have four 90 degree corners. It’s a simple process, and uses the math you swore you’d never need to use once you left school:
Next, you need to set your grade. For simplicity’s sake, I’m going to assume a near-perfect site. You want your patio to have between 1/8 and 1/4 inch of fall per foot, in order to properly shed water. So for our 12 ft patio, 1/4 inch of fall would mean that the lower portion is 3 inches lower. Looking at your site, you need to decide if that means digging out for the patio, building up for it, or a combination of the two. Because my backyard has such a steep pitch, I actually had to create a small retaining wall to hold back the lower side. I chose to use pressure-treated 6×6 timbers, but segmental retaining wall block or even concrete block with stone facing could have worked just as well. Even if you’re building up and not excavating, at least remove any sod. You want to start with a smooth, clean base that’s pretty close to the ideal pitch. How deep do you go? You want to figure on a minimum 4 inch base of 21A stone, an inch of stone dust for bedding, and the thickness of your stones. My stones had an average thickness of 2 inches, so I allowed for 7 inches of patio.
Once you have your patio area dug out and clean, you want to start by compacting the soil. The best way to do this is with a gas-powered plate compactor, available from most rental yards for around $100 a day or less. If you don’t have a helper, definitely have them deliver it and pick it up. Unless you’re a powerlifter, you’re not getting it in and out of a truck by yourself.
After the soil is compacted, lay down a separation fabric, available from your local stone and paver supplier. Don’t use the stuff from the big box store; it’s junk. Now you can start adding in your 21A in lifts. There are several terms for 21A, including crusher run, ABC, and road base. Essentially, it’s stone that has particles from 3/4 inch down to fines. Because of this range of particles, the stones lock together tightly and give you a super-compact base. Add your 21A to the patio site and rake it into a layer no thicker than 2 inches. Run the compactor over the entire surface until it’s rock hard. Add another 2 inch layer and repeat, until your base is the desired thickness. To make your life easier, keep raking the 21A as you spread it to acheive the proper fall across the surface of the patio. If your base is close, it’ll make installation of the stone a breeze.
Now that your base is in place, go ahead and add your stone dust in a 1 inch layer. Don’t compact this, as you’ll want some play as you set stones. Now, you can start laying stone. There’s no particular set of instructions except keep the pitch on the patio, tap them in with a rubber mallet, and make it look pretty. Once all the stones are in place, sweep stonedust in between the stones and wet everything down with the hose. You’ll have to do this several times to get the stone dust completely settled and locked into the joints. Hopefully, your friends and family will actually let you finish this step before they start putting furniture out there. The last step is to enjoy your new space.
As a disclaimer, this is general advice for construction of a simple patio on an ideal site. Your conditions and needs may differ; if you’re at all unsure, don’t be afraid to call in a pro. Not all landscape designers have a construction background and consult on jobs like this for homeowners, but I can’t imagine I’m the only one.
If you follow my advice and build a patio, I want pictures! Post a link in the comments.

Great article! I was wondering if you might recommend an easy way to get the crush rock to the site if it is enclosed by a fence? I cannot remove any section of the fence, and the only way in or out is through a garage door at the back of this site. Would using five gallon buckets be a major pain? Thanks.
A wheelbarrow should fit through a standard pedestrain door’ if you bucket brigade it, it’s going to be a massive pain. You can get 3, MAYBE 4 shovelfuls of stone in a 5 gallon bucket before it gets too heavy. Even if it’s not too heavy for you to pick up, it’ll be too heavy for the wire handle.
I’ve also heard they make conveyors for bulk materials that you can rent, but I’ve never looked. If for some reason a wheelbarrow won’t fit through the door, I’d actually consider a ground-level deck, if it could work with the overall design. You’d have a lot fewer materials to carry in, and if it was designed right, you’d still have a great space.
Well my doorway is 29.5″ wide (built in the 50’s) so I have to see if I can find a similar width wheelbarrow. Not sure I’ve seen a conveyor, but I imagine that may be difficult to find and get on site without the right equipment. Anyway, I’ll see if I can track down a compatible wheelbarrow. Could you estimate how many trips it will take to move 1.5 tons of crushed rock and 0.5 tons of sand with a standard wheelbarrow? Thanks again!
Hmm… mentally, I’m already at the cabin, so I can’t be trusted with the math. But, a standard contractor wheelbarrow is 6 cu ft, and I usually figure 1 cu yd of stone at about 1.5 tons. Odds are you’re not loading a full 6 cu ft of stone in the barrow, though, unless you’re a brute.
2 tons total of material isn’t bad at all, unless you’re massively out of shape. When I built my patio, I moved just a hair under 3 tons of 21A, compacting in lifts as I went, in under three hours. Yes, I’ve been doing this most of my adult life, but I’m management now!
Home Depot’s site puts their wheelbarrow at 26 or 27 inches wide. I’d verify that in person, but you should be good.
You’ll come back and post a link to pics when you’re done, right?
My husband and I are planning to install a bluestone patio and a gravel path and your articles on both are the clearest I’ve seen anywhere on the net (including about a dozen videos I’ve watched)! The patio article is about ten years old – do you still sweep stone dust between the stones or are you using polymeric sand now?
Thanks for the great instructions!
Hi Nancy! I honestly haven’t made up my mind on Gator Dust or similar products with flagstone. For our irregular flagstone back walk, I used one of the products made for bigger joints (up to 3″) and I hate it. It doesn’t seem to “grab” really well and the weeds act like there’s fertilizer in it. I think for a squares and rectangles patio it could still work well, but I see advantages to both the polymer products as well as regular stone dust.
Hi David. Thank you for writing this article and sharing your knowledge. I’m wondering if you’ve checked up on any of the dry laid patios you did after 10 years of use. My husband and I just finished a beautiful dry lay flagstone patio about 14×20. We did 4″ of crusher run then stone dust for leveling and joints. The grade is 1/8 per foot. It sheds water well. I will say we did not do the fabric under the crusher run though due to conflicting info. The patio is now 4 months old. The issue is that after a rain, the stones and stone dust are very slow to dry. We’re near Atlanta and while I know this shouldn’t be a problem in the summer heat, I do worry about the wetness the rest of the year. I’m concerned that constant exposure to moisture under and around the stones will shorten the life of our flagstone. We will definitely not be sealing the stones ever since that would likely make drying out even harder. What is your experience with this moisture issue and flagstone patios? My concern is that stone dust doesn’t drain well and maybe sand should have been used instead..?
–Leslie
Hi Leslie, stone dust holds water more than sand does, but I’ve also seen sand beds remain saturated if water doesn’t have anywhere to go. Given the compacted 21A is virtually impervious like concrete, that base layer needs to be screeded and graded properly before the bedding layer.