Why every landscape designer needs a blog

Growing up, I always wanted to be a writer. I read voraciously as a kid and I always envisioned myself locked in a cabin somewhere, with just a typewriter and a dog for company, grinding out the next great novel. While that hasn’t happened (yet), I’ve managed to parlay that love of writing into a blog with over 570 posts. This blog, started as a marketing tool, has had some unexpected results that should have every landscape designer out there blogging.

Understanding your clients better

“True love, Max! He said true love!”

The bane of writers everywhere is the blank page. “What am I going to write about?” Luckily, I just have to think about the questions I’m asked in the course of my work. Every question is a potential post topic. How do I plant for privacy? What would a reading garden design look like? Is dyed mulch safe? Coming up with post topics helps me see what I do from my clients’ point of view.

Becoming a better communicator

Blogging is, by its nature, a bit constraining. No one really goes to Google looking for a 15,000 word dissertation on drainage myths. We have to learn how to identify the question and answer it as directly and succinctly, yet thoroughly, as possible. Getting better at doing this in writing helps one become better at doing it verbally, in person. That greatly reduces the number of times I’m explaining something to a client and have to watch their eyes glaze over.

More speaking opportunities

I love walking into a room full of landscape and garden enthusiasts and getting them excited about a particular topic. As my blog grew, and more people started reading it, I began to get offers to come speak to different groups. While most of those talks haven’t led to new business, they have – once again – helped me get better at communicating with people. If, like me, you run your company from a teaching perspective, this is a wonderful side effect. You can learn more about hiring me for your group or event here

Deeper curiosity

I’ve always been a naturally curious person. Growing up in the days before the Wikipedia rabbit hole, I would spend hours in the reference section of the library and fall down old school, analog rabbit holes. Why yes I was a very cool child, why do you ask?

still cooler than I was

Blogging has encouraged me to take nothing about landscape design at face value. Everything I come across is a potential blog topic, which makes it a potential topic I can teach people about. Since I can’t teach about it until I understand it, it’s time to dive in.

So if you’re a landscape designer and you’re not blogging, why the heck not? It’s fun, it’s not all that hard, and you’ll get way more out of it than what you put in. A few years ago I created a list of 7 landscape and garden blogs worth following. Let me know who I need to add for this year’s update!


One That Got Away: Challenging Retaining Wall in DC

One of my favorite things to do on this blog is to profile recent projects. It’s a fun opportunity to show what’s possible, and maybe brag a little. Hey, my clients let me create some great landscape designs for them!

DesignerIsIn

As I was thinking about a recent sale I didn’t close I realized I should blog about it as well. After all, what killed the deal were the realities of the site and the budgetary challenges they created. There might be something to learn from this, especially if you’re planning a DC landscape design project of your own.

The site: A rowhouse in DC. It’s in a hilly neighborhood off of Rock Creek Parkway and there is a HUGE amount of elevation change between the street and the front porch.

All the homes in this neighborhood have a 10-12 foot tall stone retaining wall right at the city sidewalk. This client’s wall had deteriorated, so last year he had the wall rebuilt. Such a wall requires a huge cantilevered footing, which meant digging way back into the hill. Because the wall was being built right at the city sidewalk all excavated soil was hauled off site. The new wall was built, including a 4 foot wide set of curved steps, and only some of the removed soil was brought back.

The project for which I was called: Prior to the new wall’s construction, the homeowner had an 8-10 foot wide level piece of lawn in front of his porch. Since the wall builders didn’t bring all that soil back, it now plunged off like a ski slope. The homeowner, therefore, wanted one or two natural stone retaining walls built behind the big wall to level off the yard, new landscaping, and new low voltage landscape lighting.

Wowsers. The client wanted to have a sense of the budget, so my masonry contractor and I sat down, had some coffee, and talked it over.

The challenges:

– Access. Parking in DC is a challenge, and with the sheer wall right at the sidewalk there would be nowhere to stage materials. Everything would have to be hand carried up the steps and staged at the top of the lowest wall. If the steps were a straight shot, we could have laid boards as ramps and wheeled materials up – but that wouldn’t work on the curved steps. Getting concrete up to the wall footers would require a pump truck.

– Work area. The only space to stage materials and mix mortar is a small flat pad at the top of the new retaining wall. That means a lot of shuffling things around every day, reducing efficiency.

– Backfilling our new walls. Again, the material that was here originally never came back. This means that we would need to bring in between 40-60 cubic yards of fill dirt and topsoil. To put that in perspective, a full load in a standard tri-axle dump truck is 12-14 cubic yards.

So how would we get this quantity of soil up to the top of the site? As mentioned above, wheelbarrows were out. Hiring a ridiculous number of laborers and doing a bucket brigade would be just… ridiculous. We settled on having Sislers Stone put the soil in super sacks (sturdy bags that can hold a ton of bulk material), truck them to the site with a flatbed, and lift them into place with a rented crane. Logistics!

– Safety. Any time you have a retaining wall on a slope above another retaining wall, there’s a possibility that it will exert forces on the wall below. I let the client know that as part of the landscape design process I would have a structural engineer look at my drawings, and if he felt it required his involvement that would be an additional cost.

After all this, the landscaping and lighting were a small portion of the project cost, but it all added up. In the final analysis, we figured it would cost a minimum of $30,000 to complete the project. It was more than the homeowner wanted to spend, so we’ll hopefully revisit it later.

The unfortunate thing is that this is a $30,000 landscape installation project that could have been avoided, or at least reduced. The company that rebuilt the wall clearly didn’t work off of detailed plans or specifications. I know this because the client told me they built the steps in the wrong place, and there was clearly no communication up front about the soil hauled off site being brought back. This is yet another case where starting with a landscape designer – someone who could create a detailed set of drawings and a complete scope of work – could have saved thousands of dollars.

I would love to save you thousands of dollars! If you’re looking for a landscape designer for a project in northern Virginia, DC, or Maryland, contact us for a consultation!

What’s behind door # 1? Helping guests find your front door

MomsHouse

I grew up in a 1950s ranch house in Rhode Island. It’s the one in the photo above. You can see that there are two doors on the front of the house: the front door, which is in the center of the main structure, and the family room door (between the main structure and the garage). We could always tell when someone was coming to sell something because they’d walk right past the family room door, down the front walk, and they’d knock on the front door. No one ever used the front door; just the sound of footfalls on the front walk was enough to wring an exasperated sigh from my dad because he knew the next ten minutes would be filled with lots of “I said no”.

I still see a lot of that, even meeting with Virginia landscape design clients who live in newer homes. Have architects learned nothing? Apparently not.

Ok, I’ll grant you that it’s not a huge issue. But as a first time guest it can be frustrating when you don’t know which door to use. It’s a little embarrassing (at least for me) when it becomes obvious you chose the wrong one and from the other side of the door you hear cursing, heavy objects being slid out of the way, and the screech of protesting locks being used for the first time in years. A good architect can make this scenario a lot less likely. Look at this home, designed and built in McLean VA by AV Architects:

AV_Arch

The family entrance/mud room door is what you come to first, but it’s also tucked back in an alcove and sort of behind the corner. The difference in scale and presentation makes it obvious which is the front entry. Of course, there’s still a little ambiguity. That’s where we came in. This close-up photo shows how we eliminated that ambiguity:

AV_Night

The main walk is travertine marble pavers set on a new concrete base. The soft curve leads you to a larger gathering space at the front steps; it’s obvious where we want you to go. The path to the family entry is much simpler, just a straight run of flagstone slabs. Any first time guest will step out of her car and know exactly where to go.

Landscape design – it’s not just about making a space pretty, it’s about making a space WORK.

Do your guests get lost looking for your front door? Do you want to improve the way your outdoor spaces work? Call us at 703-679-8550 to learn about setting up a consultation today!

Note: If you’re looking for a new home in McLean, Virginia you should consider the one we’ve pictured. You can learn more about it here. If you do buy it, I already have some ideas for the landscape that I’d love to discuss with you!

Pros and Cons of Building a Pergola in Northern Virginia

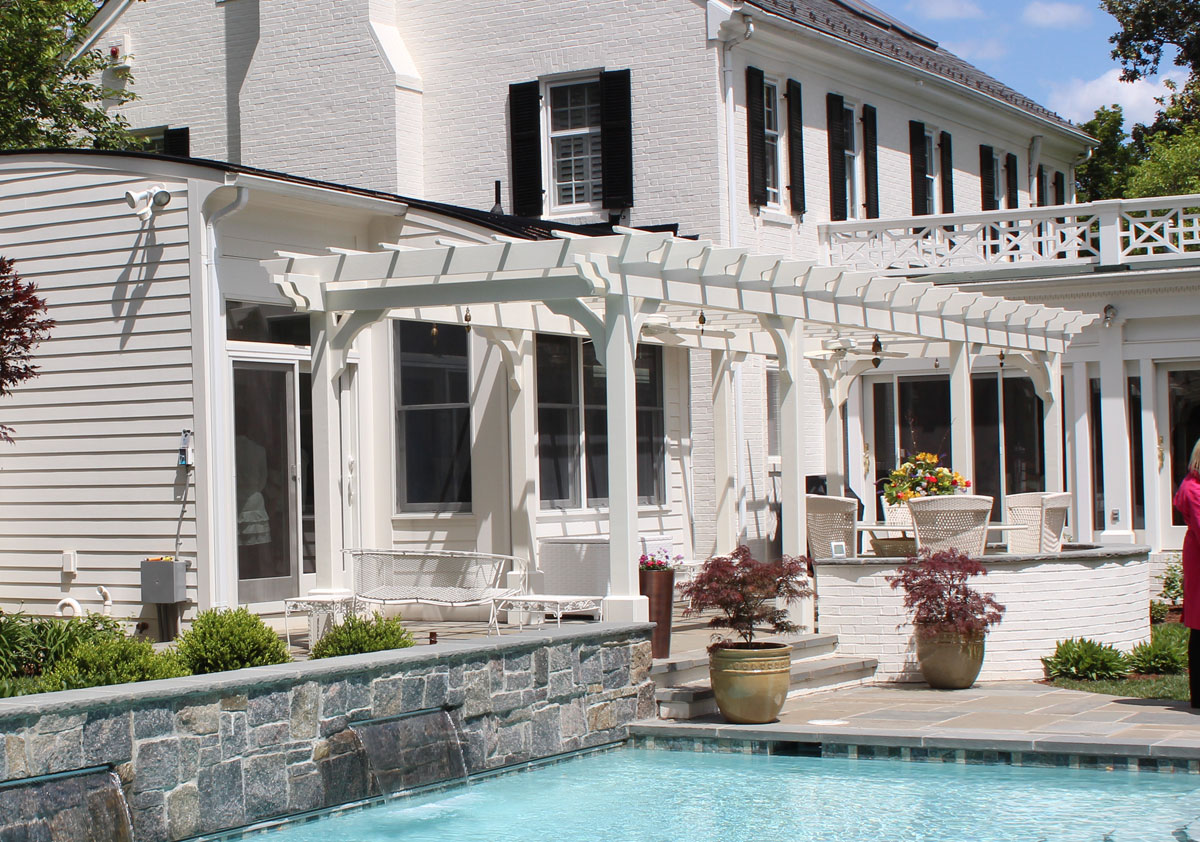
I get a lot of requests from people interested in adding a pergola to their landscape. They’re cool to begin with and they’ve been made all the more popular by HGTV, etc. over the years. Is a pergola right for you, though? Here are some pros and cons to consider.

Pergola-and-Pool

THE PROS OF BUILDING A PERGOLA

First, so we’re on the same page, let’s talk terminology. A pergola is an overhead structure without a solid, fixed roof cover. Make sense? Good. Here are some pros:

  • a pergola is generally less expensive than a roofed structure. You’d be amazed how much cost AND weight plywood and shingles add to a structure, and that structure needs to be beefy enough to withstand those loads. A pergola can be built a bit “lighter” because it’s carrying a lighter roof load. Because it’s an open-topped structure, it also doesn’t have to support a couple feet of snow. A roofed structure is also more subject to “uplift”, which is what it’s called when winds blow underneath and want to lift the roof like an umbrella.
  • Your pergola is available in a wide range of material choices. There’s basic pressure treated wood, and then there’s cedar. There’s fiberglass. There’s aluminum. We can look at your budget and your maintenance requirements and pick something that will fit those.
  • With systems like Shade FX, you can still get solid, retractable shade with your open-topped pergola.
  • A pergola helps define an outdoor “room” and as such makes your yard way cooler than your lame-o neighbors.

Pergola-Completed

THE CONS OF BUILDING A PERGOLA

  • A pergola doesn’t provide the same practical cover as a pavilion or other roofed structure. You can overcome the shade issue by using a product like Shade FX as mentioned above, but you’re still going to get damp if it rains.
  • There’s no ceiling in which to hide stuff. We’re wrapping up a pavilion that has recessed lights, ceiling fans, outlets, surround sound speakers, and home automation wiring hidden behind the ceiling and soffit panels. There’s nowhere to hide in a pergola (well, unless you do a fiberglass pergola and hide stuff in the hollow beams and rafters).
  • There are kits out there, but buyer beware. Some are great quality and will last a long time. Others are a step above a $99 screened box from Target. Know what you’re getting, and know that nothing in life is free.
  • A pergola won’t love  you like a dog will. (sorry, pergolas are awesome. I ran out of cons)

Naturally I think your first stop when considering a pergola should be a landscape design firm. In fact, how about a landscape design firm serving McLean and the rest of Northern Virginia? But that’s one (great) option.

CedarKitPergolaMcLeanVirginia


There are also the Amish-built outdoor stuff dealers you pass on the road. They have some nice products. The one issue I ran into is my clients wanted to use them for the pergola I designed. Because of the size of the span, they wanted to stick a post right in front of the fireplace. After some back and forth they agreed to explore engineered lumber. I get that the Amish are going to move at a different pace, but – six weeks to return a proposal that involved swapping out one beam? And in the end, my local carpenter was only $300 more (on a $12,000 project). So their kits = awesome, but outside the box = problem.

And of course there are lots of internet vendors. I’ve worked with some who are great, some who are ok, and one who was a horrible experience such that I hope every parking meter they use from now till eternity is defective and gets them lots of tickets. When considering one of these, ask for some local customers who have bought and installed their product.

So there you go! Pros and cons of building a pergola in Northern Virginia. If you’re ready to plunge ahead but you want your pergola to be more beautiful and more functional than anyone on your block has ever seen – call us for a consultation at 703-679-8550.

Replacing Storm Damaged Trees in Virginia, Maryland, or DC

Well, it looks like Winter Storm Titan!!! (cue dramatic music) is fizzling out already, but that’s not to say it didn’t bring ice and snow with it. Luckily it’s still early enough that deciduous trees haven’t leafed out yet so those should be ok, but ice and snow are heavy. What if your tree (or shrub) sustained storm damage?

Ice damage tree Virginia

The first step, obviously, is to wait to evaluate things until it’s safe. This means no going out in the midst of a storm, standing in the road while the plows are trying to do their job, or no going anywhere near downed wires. It seems silly to have to say but I’ve seen some crazy stuff.

Next, look at your storm damaged tree and evaluate how much of it’s been damaged. If you prune off the affected limb(s), will it still look good? Will it still be balanced enough not to be at even more risk from the next storm? If you’re really just talking about a broken limb or two, a little pruning could be all that’s needed. If you’re at all unsure, a licensed arborist is the sort of professional who can better advise you.

If it’s clearly thrashed, it’s time to replace that storm damaged tree. I prefer to call my tree guys for this type of work as they’re better equipped to do the job safely and efficiently. They’ll secure the area, address the most dangerous limbs first, and then (depending on the location of the tree) either drop it in a safe spot, or cut it into pieces which are then lowered safely to the ground.

If you want to actually replace your storm damaged tree and not just remove it, you’ll want to remove the stump as well. Your tree service can typically grind the stump for an additional fee. Just be sure that, if you want a new tree in the same spot, you have the grindings (wood chips) removed and the hole filled in with topsoil. Trees can’t grow in wood chips. It’s like a weird cannibalism thing.

Deciding on a replacement for the tree is a great reason to involve your favorite DC area landscape designer. Maybe the tree got damaged because it was the wrong plant for the place. We can make that determination and move forward from there. If you want professional guidance in selecting a great tree, contact me for a consultation. We’ll turn that tree damage into the best thing that’s happened to your yard this week!

How 40 Pounds of Dog Has Changed My Plans for 10,000 sq ft of Yard

I finally wore Mindy down this fall and we adopted a dog. This is my sweetheart Bonnie, a German Shorthair Pointer (GSP) mix who came to us via the Mid-Atlantic GSP Rescue. Say hi, Bonnie!

 Landscape Dawg

Anyone who’s met me knows it’s no secret that I’m an animal lover. Pets are something I always take into account when designing a yard, mostly as regards how the pups will move around the yard and how we can keep them safe. I didn’t think my proposed design for our backyard was an issue until we started spending time in the yard with Bonnie. Here’s what’s changed for me:

1. It needs to happen NOW. GSPs are a high energy breed. Sometimes, to help Bonnie run off excess energy, we’ll invite PJ over. PJ’s our neighbors’ rescue greyhound and the two of them tear the heck out of the flat, muddy parts of the yard. We need to deal with those, stat.

2. I need more lawn than I thought. I hate mowing in hot weather, and to the chagrin of my neighbors that becomes quite apparent. I know, I should live in a cave miles from other people. But I love downtown Culpeper! Anyhow, the original plan was to shrink  the lawn to a teeny tiny bean and have the rest of the backyard as strolling gardens. But I discovered that when throwing the Chuck It or Kick Fetch (best dog toys EVER btw), we need room for B-Dawg to get up to speed if I’m going to wear her out.

3. Too much privacy will bite me later. A section of our fence is an open trellis-style fence. The original plan was to cover a chunk of it with big oakleaf hydrangeas, but dogs get barky when they can hear what’s outside the fence and not see it. Since our neighbor kid rides his skateboard in endless loops in front of our driveway, Bonnie would bark herself hoarse if she couldn’t see him. And I don’t really want to install one of these:

DogPortal

4. A clear line of sight is important. One thing that’s common to high energy breeds is a penchant to get into trouble in the blink of an eye. While you can’t watch the dog 100% of the time, 66% is a good goal. So structures and planting beds shifted to make it a little easier to monitor the dog.

Assuming the snow ever melts and the ground softens enough to dig, I’ll start my backyard renovation and share updates here. If you’re looking for help on how to make your backyard work better for your four-legged compadres, contact me and let’s do this!

Can a Built-In Charcoal Grill Be Installed in an Outdoor Kitchen?

I’m a charcoal snob. It’s one of the reasons why I really only deal with the higher end gas grills, because an infra-red sear burner is the only way to get the same sort of awesome heat that comes pre-loaded with a bag of charcoal. It begs the question, why don’t we see more outdoor kitchens with built-in charcoal grills?

FMduo

When designing an outdoor kitchen, the challenge with the superiority of charcoal over other forms of heat is that there aren’t a lot of budget built-in charcoal grills out there. Whereas the entry point for what I would consider an ok-quality gas built-in grill is $1800-2200, stainless steel charcoal built-ins are a bit more.  I carry a Fire Magic Aurora A830i Gas and Charcoal Combo Grill. It’s pretty great, and the charcoal is lit by the gas burner for ease of lighting, but at a list price of $4,690 it can be a chunk of the budget.

Saffire

If you’re less concerned about the stainless steel look you have more options. Any of the “ceramic egg” smoker/cookers can also be used as a charcoal grill in the open position. It may seem a little big for that purpose but it certainly gets the job done. I want one of these in the worst possible way, because not only have I discovered smoked meats and cheeses – I’ve discovered smoked cocktails and infusions. mmmm. One that I offer is by Saffire, and the price point is pretty great. A freestanding Saffire smoker starts at about $1100, and one designed to sit in a kitchen island is a bit less.

(One of my former neighbors had a Big Green Egg and someone swiped it from his backyard. Nothing is sadder than seeing someone standing in his driveway, screaming “who would take a man’s egg? WHO?!?!? I WILL FIND YOUUUUUUUUUUU!!!”)

You can also click here to read my post on how to build an outdoor kitchen around a freestanding grill – we did it with a gas grill, but charcoal could also work.

It’s a pretty well known fact that I fall victim to the rabbit hole of the internet pretty easily. There’s a bright side to this, though. It means I discovered the Concrete Exchange, an online shop for products by Fu-Tung Cheng. He’s a pretty amazing designer with a contemporary bent to his styling, and he designed a lightweight concrete surround for your basic, everyday $100 Weber kettle grill. Aesthetically, maybe it’s not your cup of tea, but if you like modern  and concrete it’s pretty neat. And functional, too.

So can a built-in charcoal grill be installed in an outdoor kitchen? Sure, but they can be a little tougher to find and may demand a little modification of your cabinetry. In my opinion, though, it’s totally worth it.

If you’re planning your outdoor kitchen or any other landscape project, I’d love to help you. Contact me to discuss next steps!


Why Landscape Design for Plant Collectors is So Haaaaaaaaard (and How to Make a Cohesive Collection)

One can break landscape design clients into general categories. There are the “I don’t care whatever you want” types; the ones who are excited about the project and invested in the result but only really care about what I think is important to their yard; and then there are the plant collectors. You might think that plant collectors would be the easiest client because they’re so excited and love what I love, right? Not necessarily, because plant collectors are collectors.

starwars collection
source: kotaku.com

Maybe those of you who are less geeky than I am don’t have friends like this, but I have friends who are hardcore collectors. One of my friends is into everything Disney. Another friend is into everything Star Wars. And one of my past clients collects movie props. The common thread among these friends is that being a collector means that they simply must have that new Disney figurine, or that Han Solo in carbonite that just showed up on eBay. Except for the uber-rich, these are still collections that fit in a reasonable amount of space. Not so with plant collectors!

"I know I signed the design contract a week ago but I got bored and found these. Can you work these in too?"
“I know I signed the design contract a week ago but I got bored and found these. Can you work these in too?”

Your classic plant collector cannot pass up a plant swap or garden center sale. Your classic plant collector will pop in their fav garden center every weekend, you know, “just in case anything new came in.” If the staff at the garden center calls you by name, you’re probably a plant collector. And these folks rarely leave empty-handed. Here’s where the trouble starts, because those plants aren’t going to do well sitting in their pots for weeks and weeks. They need to go in the ground NOW but it’s ok, it’s just temporary, the collector will move things around later. When they’re done buying plants for a bit.

Riiiiiiiight.

In many cases, the spouse or partner of the collector insists that they call me. Like a college girlfriend freaked out by all the anime posters in her beau’s dorm room, the partner knows this looks a little weird and needs some help. The collector begrudgingly reaches out to me for help because word on the street is that I get plant geeks, and I might just be one myself. We set the initial consultation, and when I show up it’s everything I feared. But there’s always cool stuff for me to work with.

MozartQuotezart

That may or may not be a real Mozart quote. I found it online so who knows. But the idea is sound. In cohesive design, everything can’t be the focal point. Rhythm and repetition can move the eye around but without unity it’s all still crazy. If you want to know why plant collectors can be challenging clients, here’s why plant collectors choose their botanical booty:

  • foliage color (collectors love yellows, reds, and blues)
  • leaf shape
  • riotous blooms in colors that would confuse even the most hardcore Deadhead
  • crazy conifers and weeping evergreens

Imagine a living room with no furniture but 843 throw pillows, each one a different color, some with fringe, some with tassels, some with bells, and even one or two dozen with strobe lights and speakers that play the Woohoo song. This is often what I walk into. Luckily, I’ve done enough of these that I have a plan.

1. Budget for a really detailed site analysis

As I lay out in my discussion of the landscape design process, I estimate how long the various portions of the process will take me and that is factored into the design fee. My assistant and I recently measured a plant collector’s garden and the two of us invested a total of 8 hours just to measure and inventory everything and then draw a landscape plan of existing conditions. But, to get it right we have to know what we have to work with.

2. Accept that it all has to go somewhere on the property

Maybe the collector client searched everywhere for that hakonechloa that looks like Celtic runes under a blacklight, or maybe the peonies came from his grampa’s farm that’s no longer in the family. Unless I’m explicitly told “I don’t care about that xxxxx, it can go” I assume that the client has a story, memory, or association for every plant he or she owns.

Paeonia-Mixed-Peonies

3. Make three categories and work from there

The three categories are trees, unifying shrubs, and everything else. I would say that in about half the cases, when I work with plant collectors there are no unifying shrubs. What are these? They’re typically evergreen shrubs like hollies, laurels, or boxwood. I often get pushback from collectors on these because they’re soooooooo boring, Dave. And yes, compared to those neon chartreuse heucherella, they are. That’s the point. A fuchsia chair gets lost against a pink and orange paisley wallpaper, but it leaps out in front of a gray wall. So I place my trees, I create massing with my unifying shrubs, and then I start grouping everything else.

4. Find a common thread for how to group everything else

This is different for every plant collection. If there are a bunch of weird dwarf conifers and sedums, we can do a rockery. If we have lots of colorful foliage we can throw in some dark green plants to set them off. If the collector is a bloom fanatic, let’s group to get something blooming for as much of the year as possible. There’s always a way to tie it all together.

5. Leave room for future plant purchases

The only time a plant collector stops adding to her collection is when she’s six feet underground. Go ahead, tell me you’re done with plant acquisitions. I know better. You’ll be at the farmer’s market and spot a little 2.5″ pot of lime basil and hey, I wonder what a lime basil mojito would be like? I should buy that, it’s only one plant, and… my, that’s a nice full rosemary plant! Yep. Again, I’m one of you. You can’t fool me. So I always leave room. I try to give guidelines for what should go in a given space (leaf color, bloom time, etc) but at the end of the day it’s not my garden.

Plants4Sale

To be clear, I’m not saying plant collectors aren’t fun clients. They’re generally a blast, and I love geeking out over oddball cultivars with passionate hardcore hort peeps. But it’s far from easy turning chaos into cohesion.

If you’re looking for a landscape design solution to your crazy plant collection and you’re in northern Virginia, DC, or Maryland, call me at 703-679-8550 to set up a consultation. We’ll gush over the plants you’ve acquired along the way and then I’ll help you showcase your collection.


Bethesda Landscape Design Case Study

I’ve been really excited to share some case studies with you – detailed posts explaining what we did and why we did it – but it seemed like a lot to ask people to read. Enter the video blog! Enjoy, and if you’re the kind of person who doesn’t like web video (or maybe YouTube is blocked in your workplace?) you can read the transcription below.

Transcription:

Hi, I’m Dave Marciniak, Landscape Designer and owner of Revolutionary Gardens, and thanks for checking out this video! Today, I wanted to talk about a case study-a Bethesda Landscape design project that we did involving a new patio, water feature, a new set of steps going up to the backyard, and a whole series of plantings. To give you a little bit of a background on the project; we were approached by the homeowner who’s doing a major renovation on the house which included pushing the back wall out a couple feet. That little bit of distance really changed the whole character of the backyard and they figured it was a great opportunity to make some changes they’d been wanting to make for a long, long time.

One of the things that was most important to the homeowner was their pond. He loves his fish, loves watching the birds, and so they had this existing pond which was fine, except for the fact that it was all made out of concrete, and there was no filtration built into it whatsoever. So, it was a mess, it was really hard to care for and it just wasn’t quite big enough. So that was one of the first things.  The other issue was the patio was pretty boring, pretty blah, and just not all that functional. You can see in the pictures that it was pretty-really, really small, and just didn’t allow them to do a whole heck of a lot out there, and he had a lot of wasted space.

So, we came in, and part of the design brief-the most, most important thing, like I said was redesigning this pond for him. The second thing was to look at, how can we move things around, how can we push a little further back into the slope, and how can we give them a little bit more space back there? So, what I came up with was a design that actually incorporated a much larger pond where the retaining wall was actually the back of the pond. This allowed us to do a couple things: it allowed us to push a little bit further back into the slope; it also gave us the opportunity to make this water feature look like a mountain spring. I really wanted something that looked natural like it had always been there, and this was an opportunity to do that.

The other thing we did was create a much bigger patio space, but that’s not all that I wanted to do. I really wanted to use the paving patterns, and a little bit of the shape and flow to kind of create some special spaces, and something that would just look unlike anything that the neighbors had. So, luckily, I was able to work with some great masons, who were able to execute this. The third thing, that didn’t really come up as a part of the design brief, but something that I saw out there that I really wanted to make happen, was the fact that there were these timber steps going from the patio up into the upper area. They weren’t actually going to anything! But the nice thing about having steps like that is it’s a little design trick. You know, landscape design is all about psychology, and really kinda, you know,  playing with how people experience the space. And so when you’ve got a really, really tight back yard like that, where you can very easily feel hemmed in by the hillside behind you, the house to the other side, and all the trees and everything else- what this allowed us to do, was by creating a set of steps, a defined set of steps, right where those timbers were- it really makes it feel like you’ve got this tight space, but there’s an exit going out somewhere, and I thought that worked out really, really well.  So, to kinda walk you through some photos of what the finished space looks like…first of all here is the water feature under construction. So you can see it was a pretty significant undertaking. And what’s pretty impressive about this is the fact that there was no machine access into this backyard whatsoever, so those guys brought in all the boulders on a ball cart, and placed everything by hand. It was pretty fantastic, and I’m really glad I’m not them!

So, the pond went in and then the patio comes right up to the pond edge, and here’s where you can see the patio going in. And, this is a great shot that shows you a general overview of the patio and the shape-I mean, look at the quality of that masonry work there. Those curves are fantastic; those borders are flawless; totally thrilled with how this came out. And you can also see the steps that I was talking about.

So here are few additional finish shots of the project that lets you see what we’re looking at-I’m thrilled, I mean I couldn’t be happier with how this turned out, the homeowner’s absolutely thrilled, and just to give you a little bit more information about that water feature: as I said, the goal was to build it into the hillside and tuck it in and really make it feel like something that had been there for a long time. One of the things the homeowner mentioned that he really enjoyed about his old water feature was being able to watch the birds playing in the water while he was….procrastinating I guess in his home office? Let’s be honest…and, so what we did is by having the two stream beds; the one stream bed was a little bit closer to the patio space, where the…you know, your actual living area is, that’s where your impact is; your bigger drop off, your faster water flow-that’s where you’re getting your water sound from. The one closest to the homeowner (his office window), that one is actually a much, much slower trickle, and has a small, shallow pool, where the birds can play and splash and do their bird thing. So, that actually worked fantastic, and very, very proud of that.

Also, I just wanted to highlight, you can see the steps and how those come out, and if you’re wondering what those steps are made of-it’s actually a manmade product called (it’s a Techo-Bloc© is the manufacturer), and Rocka Step is the product; it’s a wet-cast, concrete step-and the reason why I chose to use that over a Fieldstone product or a natural product is because by being a manufactured product it actually has…manufacturers are very, very strict tolerances, so every single riser height, every single tread width-they’re all the same. So, it’s a very, very safe, very, very comfortable pathway up to the top.

Again, there’s not a whole lot of reason to go up there, except for you, you know, periodic maintenance, and you know, kinda, seeing what’s going on in the rest of the landscape, but again, it’s just something-you have that opportunity, and it looks great. We also retrofitted in this low seat wall here; this is eventually going to become an herb garden, and just be a great place for them to, actually, get a little bit of sunlight in what is otherwise a very, very shady backyard.

So, that’s an overview of this project, again it’s a Bethesda Landscape Design project that I am personally really, really proud of in how it turned out; incorporating a flagstone patio, water feature, Techo-Bloc© Rocka Steps, and again, a whole bunch of plantings, which will definitely come back and revisit in a couple years when everything has started filling out and looks even better.

I hope you’ve enjoyed this video case study and if you did enjoy it, and you want to see more of these, please subscribe to my YouTube channel. I’d absolutely love to have you come back, and again I’m Dave Marciniak with Revolutionary Gardens, and thanks for checking out my video!

Good neighbors don’t plant running bamboo!

I’ll admit that I’m not always the most extroverted person. When we visited the beautiful Annefield Vineyards in Saxe, Virginia, the thought of an old house in the middle of 100 rural acres sounded… pretty darn awesome. That said, we live in a downtown neighborhood and I like to think I’m a good neighbor. That’s one reason why I’ll never plant running bamboo on my property.

To back it up a step, there are two main classifications of bamboo, running and clumping. Clumping bamboo is well behaved, staying in tight little clumps (thus the name). The problem is that most clumping bamboos that grow in the DC area don’t get that big or look that flashy. They’re a good solution for a shady area or a tight spot that could use something vertical, but you don’t really get excited about clumping bamboos.

Running bamboos are the exciting ones. There’s black bamboo, with the deep, dark stems, if you want color. If you want screening, some running bamboos will easily make 20-30′ tall in our area. And if you want big, thick Gilligan’s-Island-construction-materials bamboo, it’s running bamboo. However, as with many desirable things (muscle cars, the promise of power from following Voldemort) there’s a darker side to running bamboo. It’s called running bamboo for a reason.

Bamboo Rhizome - Source: Armin Kubelbeck
Bamboo Rhizome – Source: Armin Kubelbeck

Everything in Nature exists to reproduce, right? The way running bamboo does this is underground, via rhizomes. These rhizomes don’t respect property lines or fences, and they’ll even pop up on the far side of a sidewalk or a driveway. Because so much of its mass is underground and it grows so fast, herbicides don’t do a lot to running bamboos. The only sure way of eradication is mechanical.

We’re doing a DC landscape design project right now where the neighbor, many years ago, planted running bamboo. Our client is having everything on her side of the fence removed (as best we can – there’ll be continual maintenance for a good 12-18 months), after which the guys are trenching down 28″ and installing a flexible bamboo barrier. It’s a lot of labor, which means it’s not cheap, all because someone didn’t thoroughly research what they probably thought was a good privacy plant.

Bamboo in DC

Can bamboo be kept contained? According to the experts, it can. The bamboo barrier we’re installing is one way. An old-school approach is a poured concrete wall around the planting. I hesitate to recommend this because concrete will crack eventually, and all it takes is one errant shoot and you’re done. Bottom line: I have a hard time recommending that anyone with nearby neighbors plant running bamboo. Even if you take all the right precautions, something can still go wrong, and then your neighbors hate you.

If you found this post useful, be sure to like my Facebook page! And of course, if you want to create a gorgeous backyard (that won’t make your neighbors hate you) I’d love to talk with you. Contact me here!