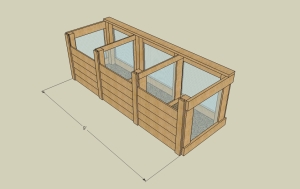
 As soon as we moved in, I started a compost pile. I’ve done a fair bit of reading on the subject, but it all comes back to a simple principle- throw it on the pile, cover with dirt, and it’ll rot. Nature’s easy that way. It’s worked pretty well up till now, but my sprawling compost heap’s shortcomings are becoming more pronounced. It’s not compact and organized enough to get truly thermophilic and kill weed seeds, and it’s kind of ugly. Even if I was managing to keep the weeds off it (I’m not) and faithfully cover everything daily (nope), it’d still be a mound of happy soil sprawling between a couple rows of concrete masonry units. We need to impose some order on decay!
I’ve read and reread the book “Let It Rot,” and took the author’s recommendation for a three-bin system. I bought everything on the materials list, brought it home, and… promptly began a different project. That was in December. Since then I’ve snagged the lumber and hardware for other, more pressing projects around the yard. Now that I’ve been told to finish the bins before starting another project, I decided to take the principles I’ve seen other people use and build a better compost bin.
The biggest design flaw I saw with most three-bin systems is stability. They’re built from standard dimensional lumber, basically 2×4 frames nailed or bolted together. I don’t see it. I mean, three 3’x3’x3′ bins full of compost in various stages of cooking? That’s a fair bit of weight, and I would think that as you’re turning or removing compost you’ll be putting some stress and strain on the joints. Plus, they all use 1×6’s in a “track” to hold the compost in on the front side; I would imagine that if such a flimsy bin setup were to get racked and go out of square, adding and removing slats would be a nightmare. No thanks.
So here’s my proposed bin system: 4×4 (or 6×6, still unsure) posts, 2×6 lumber for outside framing. The sides and back will be that stout metal poultry netting/hardware cloth, since I already own a roll. The winters have been mild enough that my compost still cooks, so I figure that if I needed some insurance I could always stack straw bales against the bin for insulation, then compost the straw in the spring.
This weekend should be a continued reprieve from our earlier hot temperatures. I’ll post photos when it’s done.
UPDATE: The bins are done! If you found your way here via a search engine, click here to see the finished setup. All in all, I’m totally pleased with how it turned out, and it’s made life SO much easier. We collect all the kitchen from our household and that of another couple, so we’d have a sloppy mess without the bins.

Where are those pictures??? I’ve enjoyed reading the other posts you do have up.
Um, yeah… about that. Sorry. I’ve been doing this landscaping thing since I was 14- you’d think I’d know better than to plan a non-client related project outside of winter. I can share photos of the pile of lumber, though. Seriously, I’m hoping to get started in a couple of weeks.
What was the cost to build your own compost bin?
Hm, hard to say; I gathered materials over several months, and the oak price included 4 twelve-foot long 6×6 posts. Ballparking a cost, I think the poultry netting and staples were around $25; 16 bags of quikcrete @ $4 each= $64. If you were to use all virgin pressure-treated lumber, I’d figure $150-200 would do you, more if you went with cedar. If you threw another $25 or so at it for screws and miscellanous items, you’d be right there.
I had hoped to build this with mostly scavenged lumber, but time became a factor. I’ve seen some functional bins made from pallets, but they’re not pretty. I think a decent compromise would be to still use 4×4 posts, but then pop the slats off of pallets and use those for the back and sides. Any scraps left over from cutting the slats to length will make great carbon for the pile, if you can chip them. Otherwise, they’re great for a campfire.